
fastdfs搭建
- tracker:跟踪者,负责调度存储服务
- storage:用于文件存储
- client:调用tracker
ansible 执行远程机器上的脚步找不到可执行文件
ansible remote.ip -m shell -a "cd /Users/home/work/dir && ./do.sh" 脚本启动jar应用,应用中会执行命令,类似 appium -v。提示找不到appium;但如果登陆到原创机器再手动启动,可以正常返回结果。(说明环境变量中没有可执行文件 appium)
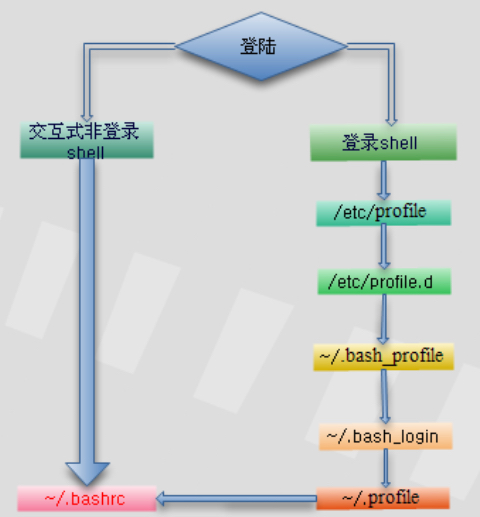
ansible远程执行shell报错:command not found,思路就是要在do.sh的环境中确保可以找到对应的bin文件。涉及到login shell和no-loginshell的关系与区别——
简单理解:当登录到终端时,执行的是login shell;如果从shell环境执行一个shell脚本,则此shell脚本的环境属于非登录shell。两者加载环境变量的方式不同——
执行 echo $0 返回 -bash为 Login Shell;返回 bash为 No-Login Shell;
login-shell
- Login shell invokes
/etc/profile /etc/profileinvokes scripts in/etc/profile.d/*.sh- Then executes users
~/.bash_profile ~/.bash_profileinvokes users~/.bashrc~/.bashrcinvokes/etc/bashrc
no-login shell
- Non login shell first executes
~/.bashrc - Then
~/.bashrcexecutes/etc/bashrc /etc/bashrccalls the scripts in/etc/profile.d
ansible -inventory –list
列出配置的所有列表。 ansible --version将显示出来配置文件位置,通常位于 /etc/ansible/ansible.cfg
tty 是什么
What is TTY in Linux?,Linux 黑话解释:TTY 是什么?
tty for TeletypeWriter. 与console的关系。
nushell
brew install nushell

➜  ~ nu
No environment config file found at /Users/geb/Library/Application Support/nushell/env.nu
Would you like to create one with defaults (Y/n):
Y
Environment config file created at: /Users/geb/Library/Application Support/nushell/env.nu
No config file found at /Users/geb/Library/Application Support/nushell/config.nu
Would you like to create one with defaults (Y/n):
Y
Config file created at: /Users/geb/Library/Application Support/nushell/config.nu
     __  ,
 .--()°'.' Welcome to Nushell,
'|, . ,'   based on the nu language,
 !_-(_\    where all data is structured!

Please join our Discord community at https://discord.gg/NtAbbGn
Our GitHub repository is at https://github.com/nushell/nushell
Our Documentation is located at http://nushell.sh
Tweet us at @nu_shell

It's been this long since Nushell's first commit:
3yr 8month 1wk 4day 13hr 18min 26sec 172ms 562µs

You can disable this banner using the config nu command
to modify the config.nu file and setting show_banner to false.

let-env config = {
    show_banner: false
    ...
}
alias传递参数
alias本身不支持传递命令行参数,但可以通过自定义函数来实现外部参数的使用,类似—— alias s='UpMachine(){ ssh root@$1;};UpMachine'
删除以中划线开头的文件
直接使用rm -fine.name报错rm: illegal option -- 8
How to remove files starting with double hyphen
- 使用当前路径+文件名方式,例如
rm ./-fine.name - 使用
rm -- --testings.html方式 - 使用node的删除方式,见下
➜  special ls -ilrt ./
total 240
679155 -rw-r--r-- 1 root root 243308 Feb 14 01:14 -e1T_oEsUcY.jpg
➜  special ls
-e1T_oEsUcY.jpg
➜  special find ./ -inum 679155 -exec rm {} \;
➜  special ls
support sz rz
use iterm2-zmodem
iterm2 trigger
set up two triggers as following:
  Regular expression: rz waiting to receive.\*\*B0100
  Action: Run Silent Coprocess
  Parameters: /usr/local/bin/iterm2-send-zmodem.sh
  Instant: checked

  Regular expression: \*\*B00000000000000
  Action: Run Silent Coprocess
  Parameters: /usr/local/bin/iterm2-recv-zmodem.sh
  Instant: checked
# send-zmodem
#!/bin/bash
# Author: Matt Mastracci (matthew@mastracci.com)
# AppleScript from http://stackoverflow.com/questions/4309087/cancel-button-on-osascript-in-a-bash-script
# licensed under cc-wiki with attribution required
# Remainder of script public domain


osascript -e 'tell application "iTerm2" to version' > /dev/null 2>&1 && NAME=iTerm2 || NAME=iTerm
if [[ $NAME = "iTerm" ]]; then
	FILE=`osascript -e 'tell application "iTerm" to activate' -e 'tell application "iTerm" to set thefile to choose file with prompt "Choose a file to send"' -e "do shell script (\"echo \"&(quoted form of POSIX path of thefile as Unicode text)&\"\")"`
else
	FILE=`osascript -e 'tell application "iTerm2" to activate' -e 'tell application "iTerm2" to set thefile to choose file with prompt "Choose a file to send"' -e "do shell script (\"echo \"&(quoted form of POSIX path of thefile as Unicode text)&\"\")"`
fi
if [[ $FILE = "" ]]; then
	echo Cancelled.
	# Send ZModem cancel
	echo -e \\x18\\x18\\x18\\x18\\x18
	sleep 1
	echo
	echo \# Cancelled transfer
else
	/usr/local/bin/sz "$FILE" -e -b
	sleep 1
	echo
	echo \# Received $FILE
fi
# receive content
#!/bin/bash
# Author: Matt Mastracci (matthew@mastracci.com)
# AppleScript from http://stackoverflow.com/questions/4309087/cancel-button-on-osascript-in-a-bash-script
# licensed under cc-wiki with attribution required
# Remainder of script public domain


osascript -e 'tell application "iTerm2" to version' > /dev/null 2>&1 && NAME=iTerm2 || NAME=iTerm
if [[ $NAME = "iTerm" ]]; then
	FILE=$(osascript -e 'tell application "iTerm" to activate' -e 'tell application "iTerm" to set thefile to choose folder with prompt "Choose a folder to place received files in"' -e "do shell script (\"echo \"&(quoted form of POSIX path of thefile as Unicode text)&\"\")")
else
	FILE=$(osascript -e 'tell application "iTerm2" to activate' -e 'tell application "iTerm2" to set thefile to choose folder with prompt "Choose a folder to place received files in"' -e "do shell script (\"echo \"&(quoted form of POSIX path of thefile as Unicode text)&\"\")")
fi

if [[ $FILE = "" ]]; then
	echo Cancelled.
	# Send ZModem cancel
	echo -e \\x18\\x18\\x18\\x18\\x18
	sleep 1
	echo
	echo \# Cancelled transfer
else
	cd "$FILE"
	/usr/local/bin/rz -E -e -b --bufsize 4096
	sleep 1
	echo
	echo
	echo \# Sent \-\> $FILE
fi
update bash
Mac 环境默认的bash版本为3.2版本。
globstar: invalid shell option name on macOS even with bash 4.X
$ brew install bash
$ chsh -s /usr/local/bin/bash
$ sudo bash -c 'echo /usr/local/bin/bash >> /etc/shells'
$ ln -s /usr/local/bin/bash /usr/local/bin/bash-terminal-app
升级后目前为5.0.7版本。 执行bash -O后会进入bash环境并显示目前的选项。 shopt -s globstar设置
What do double-asterisk wildcards mean?,设置 **为递归匹配模式
linux 环境
Root can run commands as other users via the “su” command. I believe if you create or edit /etc/rc.local and add this line to it:
su -c /path/to/your/script username
$符号用法
# http://www.codebaoku.com/it-shell/it-shell-220865.html
$0	Shell 的命令本身
1到9	表示 Shell 的第几个参数
$?	显示最后命令的执行情况
$#	传递到脚本的参数个数
$$	脚本运行的当前进程 ID 号
$*	以一个单字符串显示所有向脚本传递的参数
$!	后台运行的最后一个进程的 ID 号
$-	显示 Shell 使用的当前选项

使用 ${#} 获取变量字符串长度
[root@localhost etc]# s=helloworld
[root@localhost etc]# echo "s.length = ${#s}"
s.length = 10
command not found
一大批常用命令不可用;通常是因为环境变量被改错了。先临时重新加入即可—— export PATH=/usr/local/sbin:/usr/local/bin:/sbin:/bin:/usr/sbin:/usr/bin:/root/bin
然后看看编辑的 bashrc 文件之类的是否有错误,例如 把 $PATH 误写为 %PATH。
journalctl 查询log
How To Use Journalctl to View and Manipulate Systemd Logs
systemd环境下的集中管理log的组件:journalctl
如果Make命令运行时没有指定目标,默认会执行Makefile文件的第一个目标
BASH_SOURCE[0]参数表示脚本自身
DIR="$( cd “$( dirname “${BASH_SOURCE[0]}” )” && pwd )" How does that work?
htop
htop official site, htop explained, Explanation of everything you can see in htop/top on Linux.
BASH_REMATCH
Bash: Using BASH_REMATCH to pull capture groups from a regex
if [[ "The quick brown fox" =~ ^The.*(fox)$ ]]; then
  echo "The animal is a ${BASH_REMATCH[1]}"
fi

The animal is a fox


IFS='\n'
cat /proc/cpuinfo | while read line ; do
  if [[ "$line" =~ ^cache[[:blank:]]size[[:blank:]]*:[[:blank:]]([[:digit:]]*)[[:space:]]([[:alpha:]]*) ]]; then
    echo cache set to ${BASH_REMATCH[1]} ${BASH_REMATCH[2]}
  fi
done

cache set to 16384 KB
cache set to 16384 KB
cache set to 16384 KB
cache set to 16384 KB
新用户添加sudo权限
ubuntu: sudo adduser newuser; sudo usermod -aG sudo newuser,验证 groups newuser
CentOS7: By default, CentOS 7 has a user group called the “wheel” group. Members of the wheel group are automatically granted sudo privileges. Adding a user to this group is a quick and easy way to grant sudo privileges to a user.
两种方式:一是打开wheel组设置,将用户添加到wheel组;二是编辑/etc/sudoers文件,为新用户添加权限UserName ALL=(ALL) ALL
使用openssl生成秘钥
#!/usr/bin/env bash

set -e
set -o pipefail

workdir="$1"
format="$2"

if [ ! -d "$workdir" ]; then
  printf >&2 'Error: "%s" is not a directory.\nUsage: %s WORKDIR\n' "$workdir" "$0"
  exit 2
fi

if [ ! -f "$workdir/ecdsa.key" ]; then
  (umask 0177 &&
    openssl ecparam -name prime256v1 -genkey -noout -out "$workdir/ecdsa.ec.key" &&
    openssl pkcs8 -topk8 -in "$workdir/ecdsa.ec.key" -nocrypt -out "$workdir/ecdsa.key")
  rm -f "$workdir/ecdsa.ec.key"
fi

if [ ! -f "$workdir/ecdsa.pem" ]; then
  openssl ec -in "$workdir/ecdsa.key" -pubout -out "$workdir/ecdsa.pem"
fi

if [ "$format" == "hex" ]; then
  openssl ec -in "$workdir/ecdsa.key" -outform DER \
    | openssl pkcs8 -topk8 -nocrypt -inform DER -outform DER \
    | python -c 'import sys; print("".join(r"\x%.2x" % ord(x) for x in sys.stdin.read()))'
else
  openssl ec -in "$workdir/ecdsa.key" -outform DER \
    | openssl pkcs8 -topk8 -nocrypt -inform DER -outform DER \
    | base64
fi
umask 设置用户创建文件的默认权限
umask 显示、设置文件的缺省权限即默认权限。 umask介绍及设置
生成私钥
生成一个prime256v1的私钥文件
ecparam
          EC parameter manipulation and generation.

 -name val           Use the ec parameters with specified 'short name'
 -genkey             Generate ec key
 -noout              Do not print the ec parameter
 openssl ecparam -list_curves #查看支持的curves,其中包括 prime256v1 (X9.62/SECG curve over a 256 bit prime field)
格式化处理私钥
将私钥格式化处理为 ecdsa.key
 pkcs8
           PKCS#8 format private key conversion tool.
 -topk8              Output PKCS8 file
 -nocrypt            Use or expect unencrypted private key
 -in infile          Input file
 -out outfile        Output file
从私钥中提取公钥
ec  EC (Elliptic curve) key processing.
-pubout           Output public key, not private
-outform PEM|DER  Output format - DER or PEM
- DER:用二进制DER编码的证书
- PEM:用ASCLL(BASE64)编码的证书
- CER:存放公钥,没有私钥
- PFX:存放公钥和私钥
(pem 后缀的证书都是base64编码;der 后缀的证书都是二进制格式;crt .cer 后缀的文件都是证书文件(编码方式不一定,有可能是.pem,也有可能是.der);.pfx 主要用于windows平台,浏览器可以使用,也是包含证书和私钥,获取私钥需要密码才可以)
使用opensll加解密压缩文件
加解密tar文件,通过命令行传递密码How to use password argument in via command line to openssl for decryption
将当前目录下所有文件进行压缩,然后传递给openssl进行加密(-e encrypt, -d decrypt),使用aes256加密算法,输出到mainsonar.tar.gz文件,加密密码-pass pass:password
tar -czf - * | openssl enc -e -aes256 -pass pass:password -out mainsonar.tar.gz
加密后的tar包直接使用tar -xzf mainsonar.tar.gz解压时报错——
gzip: stdin: not in gzip format
tar: Child returned status 1
tar: Error is not recoverable: exiting now
使用openssl先进行解密—— openssl enc -d -aes256 -in mainsonar.tar.gz -pass pass:password |tar xz,如果传递的密码不正确,报错——
gzip: stdin: not in gzip format
tar: Child died with signal 13
tar: Error is not recoverable: exiting now
- 其他加密方式,参考How to Create an Encrypted (Password Protected) Tar or Zip Archive in Linux
- openssl ciphers
- 加密原理解释Cipher Suites: Ciphers, Algorithms and Negotiating Security Settings
加密文件操作在CentOS7上操作,版本为1.0.2k版本 # OpenSSL 1.0.2k-fips 26 Jan 2017。在ubuntu上下载成功后,与原始文件对比MD5值相同。文件有效。但尝试解密时却报错——
*** WARNING : deprecated key derivation used.
Using -iter or -pbkdf2 would be better.
bad decrypt
139932932575680:error:06065064:digital envelope routines:EVP_DecryptFinal_ex:bad decrypt:../crypto/evp/evp_enc.c:537:
Ubuntu的openssl版本为OpenSSL 1.1.1 11 Sep 2018版本。
参考——
The default hash used by openssl enc for password-based key derivation changed in 1.1.0 to SHA256 versus MD5 in lower versions. This produces a different key from the same password (and salt if used as it usually is), and trying to encrypt and decrypt with different keys produces garbage, an error, or both.
原因是高版本加密时对密码使用sha256进行加密;低版本使用md5方式。如果需要兼容,则需要指定参数 -md的值,确保两边使用相同的摘要算法。所以在高版本上对上述文件进行解密时,命令为——
openssl enc -d -aes256 -md md5 -in mainsonar.tar.gz -pass pass:password |tar xz
&& in Shell
Boolean operators ( &&, -a, ||, -o ) in Bash
Rule of thumb: Use -a and -o inside square brackets, && and || outside.
It’s important to understand the difference between shell syntax and the syntax of the [ command.
&& and || are shell operators. They are used to combine the results of two commands. Because they are shell syntax, they have special syntactical significance and cannot be used as arguments to commands.
[ is not special syntax. It’s actually a command with the name [, also known as test. Since [ is just a regular command, it uses -a and -o for its and and or operators. It can’t use && and || because those are shell syntax that commands don’t get to see.
[ "$1" = 'yes' ] && [ -r $2.txt ]
#效果相同
[[ "$1" = 'yes'  &&  -r $2.txt ]]
change swap size
Ref or refer here
#Turn off all swap processes
sudo swapoff -a

#Resize the swap
sudo dd if=/dev/zero of=/swapfile bs=1G count=8
#if = input file
#of = output file
#bs = block size
#count = multiplier of blocks

#Make the file usable as swap
sudo mkswap /swapfile

#Activate the swap file
sudo swapon /swapfile
#Check the amount of swap available
grep SwapTotal /proc/meminfo
chrome on linux
wget https://dl.google.com/linux/direct/google-chrome-stable_current_amd64.deb
refresh favicon for chrome
How to refresh bookmark favicons in chrome
- Close Chrome
- Open your User Data Directory folder
- Delete the
Faviconsfile - Run Chrome
- Visit sites to force the icons to be re-downloaded
grep 过滤多个字符
grep -E 'aaa|bbb|ccc'
软连接 更新
RTFM:
ln [OPTION]... [-T] TARGET LINK_NAME   (1st form)
In the 1st form, create a link to TARGET with the name LINK_NAME.

#前路径创建test 引向/var/www/test 文件夹
ln –s  /var/www/test  test
json tool jq
# install
sudo apt-get install jq
# manual: https://stedolan.github.io/jq/manual/v1.5/
	jq '.[]'
Input	[{"name":"JSON", "good":true}, {"name":"XML", "good":false}]
Output	{"name":"JSON", "good":true}
{"name":"XML", "good":false}

# usage: https://www.cnblogs.com/bymo/p/7484023.html
dictionay Artha
sudo apt-get install artha
输入法无法选词问题处理
#第一步:备份 ibus 拼音输入法的数据库文件
cp ~/.cache/ibus/libpinyin/user_bigram.db .

第二步:删除 ~/.cache/ibus/libpinyin/ 目录下的所有文件
rm -r ~/.cache/ibus/libpinyin/*
#第三步:将之前备份的数据库文件放回到原目录下
mv user_bigram.db ~/.cache/ibus/libpinyin

第四步:重新启动 ibus 输入法 可以直接继续使用?
查看系统调用 strace
strace ls -al将打印所有的系统调用,然后再执行后面的 ls -al 命令内容
tar xz file
xz是绝大数linux默认就带的一个压缩工具。
创建tar.xz文件:
先 tar cvf xxx.tar xxx/ 这样创建xxx.tar文件先,然后使用 xz -z xxx.tar 来将 xxx.tar压缩成为 xxx.tar.xz
解压tar.xz文件
先 xz -d xxx.tar.xz 将 xxx.tar.xz解压成 xxx.tar 然后,再用 tar xvf xxx.tar来解包。
命令行打开目录,设置别名
nautilus

#设置别名: update profile such as ~/.bashrc file
alias open="nautilus"
ubuntu 18.04开机启动
execute shell at start up, 手动创建 /etc/systemd/system/rc-local.service和 /etc/rc.local文件, 后者需要赋予可执行权限。将服务加入systemctl
# content for /etc/systemd/system/rc-local.service
[Unit]
Description=rc.local service by geb
After=network.target
ConditionFileIsExecutable=/ect/rc.local

[Service]
ExecStart=/etc/rc.local

[Install]
WantedBy=default.target
Alias=rc.local.service

# specific bash script for rc.local

chmod 664 /etc/rc.local
systemctl daemon-reload
systemctl enable rc.local.service
最小配置——
[Unit]
After=mysql.service

[Service]
ExecStart=/usr/local/bin/disk-space-check.sh

[Install]
WantedBy=default.target
- After: Instructs systemd on when the script should be run. In our case the script will run after mysql database has started. Other example could be
network.targetetc. - ExecStart: This field provides a full path the actual script to be execute
- WantedBy: Into what boot target the systemd unit should be installed
其它配置参考man systemd.service或systemd.service.html
use oh my zsh
# need to install zsh first
sudo apt-get -y instal zsh

# zsh --version to check version

wget https://raw.githubusercontent.com/ohmyzsh/ohmyzsh/master/tools/install.sh
sh install.sh
update zsh
修改快捷键后,需要commit修改内容,否则升级时会提示——
Updating Oh My Zsh
error: cannot pull with rebase: You have unstaged changes.
error: please commit or stash them.
There was an error updating. Try again later?
执行正常的commit操作,然后手动执行 upgrade_oh_my_zsh命令升级
> cd ~/.oh-my-zsh
> git status
> git stash
> upgrade_oh_my_zsh
> git stash pop
查找指定深度的文件目录
find . -mindepth 2 -maxdepth 2 -type d 参数顺序如果为 find . -type d -maxdepth 2 -mindepth 2将提示——
find: warning: you have specified the -maxdepth option after a non-option argument -type, but options are not positional (-maxdepth affects tests specified before it as well as those specified after it).  Please specify options before other arguments.

find: warning: you have specified the -mindepth option after a non-option argument -type, but options are not positional (-mindepth affects tests specified before it as well as those specified after it).  Please specify options before other arguments.
screenshots and screencasts
- Prt Scrn to take a screenshot of the desktop.
- Alt+Prt Scrn to take a screenshot of a window.
- Shift+Prt Scrn to take a screenshot of an area you select.
You can also hold down Ctrl with any of the above shortcuts to copy the screenshot image to the clipboard instead of saving it.
计算字符串长度
cat /etc/passwd | wc -L
-L参数
- 对多行文件来说,表示打印最长行的长度! 82,表示/etc/passwd文件最长行的长度为82
- 对单行字符串而言,表示当前行字符串的长度!
# 发送空文件?
curl  -F "file_1=@files.zip" -F "file_2=@/dev/null;filename=" -F "file_3=@/dev/null;filename="
# 计算字符串长度 -l line; -L 字符长度
md5sum test.file |awk -F\  '{print $1}' | wc -L
Base64
openssl can also encode and decode base64
$ openssl enc -base64 <<< 'Hello, World!'
SGVsbG8sIFdvcmxkIQo=
$ openssl enc -base64 -d <<< SGVsbG8sIFdvcmxkIQo=
Hello, World!
curl form
curl call telnet
curl -v telnet://8.8.8.8:80
curl --help查看文档
-F, –form <name=content> Specify HTTP multipart POST data
–form-string <name=string> Specify HTTP multipart POST data
What is the right way to POST multipart/form-data using curl?
Window环境下可能有空格问题,需要转义 curl -v -F 'upload=@\"C:/myfile.txt\"' URL
curl Authorization: Basic
curl -H "Authorization: Basic ZnJlZDpmcmVk" -X GET -H "Content-Type: application/json" http://localhost:8080/rest/api/2/issue/createmeta
Curl post in Windows env
坑死,需要做转义控制,负责解析失败。使用双引号,然后数据中的key-value值的双引号需要做转义,类似下面
curl -i -H "Accept:application/json" -H "Content-Type:application/json" -XPOST "http://sss.com/abc/" -d "{\"email_address\":\"test@abc.com\"}"
否则将报错:invalid character '\'' looking for beginning of value
curl post json
curl: (7) Failed to receive SOCKS4 connect request ack. 原因为本地网络设置了代理服务;关闭本地代理服务之后,需要新启动一个terminal才会生效。
curl -i -H "Accept:application/json" -H "Content-Type:application/json" -XPOST "http://sss.com/abc/" -d '{"op":"Device.restartDevice","device":{"imei":"866568023794679"}}'
方法中如果需要传递参数,需要使用如下方式——
para="value of para"
curl https://xxx.com/api/ -XPOST -H 'Content-Type: application/json' -d '{"category":"PLAIN_TEXT","data":"'"$para"'"}'
curl post json with parameter
传递参数:
Using curl POST with variables defined in bash script functions
write a function that generates the post data of your script. This saves you from all sort of headaches concerning shell quoting.
- 利用函数生成需要的数据
- 函数中可以正常使用各种参数
- curl post data由函数返回
- 注意函数中第二个
EOF要位于行首
commit=$1
branch=$2
project=$3
group=$4
user=$5

username=`echo $user |awk -F@ '{print $1}'`

function createData() {
    content="【单测报错】\n项目组:\t$group \n项目:\t$project \n分支:\t$branch \ncommit:$commit \n请到gitlab查看对应的pipeline"
    cat <<EOF
    {
      "to":"$username",
      "content":"$content",
      "otherKey":"value"
    }
EOF
}

function SendNote() {
    curl -i -H "Content-Type:application/json" -XPOST "http://sss.com/abc/" -d "$(createData)"
}
curl 与 bash 联动
-o 参数表示输出到文件,如 curl -o aa example.com -o bb example.net
curl默认输出到屏幕
wireless adapter
first: Fix ‘No WiFi Adapter Found’ with Ubuntu 18.04, it says “Required key not avilable”, need to disable secure boot. and install new package as following: Linux wireless driver for HP 14-am100na notebook, finally, it works.
sudo apt-get install bcmwl-kernel-source
Sublime Text
issue 60,目前不支持系统自带的中文输入法。使用VS Code代替。
Official Doc Eclipse、Sublime快捷键 install doc Install the GPG key:
wget -qO - https://download.sublimetext.com/sublimehq-pub.gpg | sudo apt-key add -
Ensure apt is set up to work with https sources:
sudo apt-get install apt-transport-https
Select the channel to use:
Stable
echo "deb https://download.sublimetext.com/ apt/stable/" | sudo tee /etc/apt/sources.list.d/sublime-text.list
Dev
echo "deb https://download.sublimetext.com/ apt/dev/" | sudo tee /etc/apt/sources.list.d/sublime-text.list
Update apt sources and install Sublime Text
sudo apt-get update
sudo apt-get install sublime-text
16.04 同步时间
How To Set Up Time Synchronization on Ubuntu 16.04 时间不同步将导致log文件无法生产。
$>timedatectl
      Local time: Fri 2018-11-16 10:04:45 CST
  Universal time: Fri 2018-11-16 02:04:45 UTC
        RTC time: Fri 2018-11-16 02:04:45
       Time zone: Asia/Chongqing (CST, +0800)
 Network time on: yes
NTP synchronized: yes
 RTC in local TZ: no

# avaliable time zone
timedatectl list-timezones

# set time zone
timedatectl set-timezone Asia/Shanghai

# check time
date
Gtk-Message: 23:27:47.368: Failed to load module “canberra-gtk-module”
- 先按照对应的lib库;
- 依然报错后,使用 cat + more(
cat log-20181105232733.txt|more)的方式可以查看。 会先报错,然后可以恢复正常。
Failed to load module “canberra-gtk-module” … but already installed
# not work
apt-get install libcanberra-gtk-module:i386
# not work
apt install libcanberra-gtk-module libcanberra-gtk3-module

##whole log
root@testin-OptiPlex-7050:/home/testin/桌面/xcdir/_logs# apt install libcanberra-gtk
libcanberra-gtk0            libcanberra-gtk3-dev        libcanberra-gtk-common-dev  libcanberra-gtk-module
libcanberra-gtk3-0          libcanberra-gtk3-module     libcanberra-gtk-dev
root@testin-OptiPlex-7050:/home/testin/桌面/xcdir/_logs# apt install libcanberra-gtk
libcanberra-gtk0            libcanberra-gtk3-dev        libcanberra-gtk-common-dev  libcanberra-gtk-module
libcanberra-gtk3-0          libcanberra-gtk3-module     libcanberra-gtk-dev
root@testin-OptiPlex-7050:/home/testin/桌面/xcdir/_logs# apt install libcanberra-gtk-module
正在读取软件包列表... 完成
正在分析软件包的依赖关系树
正在读取状态信息... 完成
libcanberra-gtk-module 已经是最新版 (0.30-5ubuntu1)。
升级了 0 个软件包,新安装了 0 个软件包,要卸载 0 个软件包,有 6 个软件包未被升级。
root@testin-OptiPlex-7050:/home/testin/桌面/xcdir/_logs# sed -n '1,30p' log-20181105232733.txt
Gtk-Message: 23:27:47.368: Failed to load module "canberra-gtk-module"
log4j:ERROR setFile(null,true) call failed.
java.io.FileNotFoundException: /home/testin/桌面/xcdir/logs/debug.log (权限不够)
        at java.io.FileOutputStream.open0(Native Method)
        at java.io.FileOutputStream.open(FileOutputStream.java:270)
        at java.io.FileOutputStream.<init>(FileOutputStream.java:213)
        at java.io.FileOutputStream.<init>(FileOutputStream.java:133)
        at org.apache.log4j.FileAppender.setFile(FileAppender.java:294)
        at org.apache.log4j.FileAppender.activateOptions(FileAppender.java:165)
        at org.apache.log4j.DailyRollingFileAppender.activateOptions(DailyRollingFileAppender.java:223)
        at org.apache.log4j.config.PropertySetter.activate(PropertySetter.java:307)
        at org.apache.log4j.config.PropertySetter.setProperties(PropertySetter.java:172)
        at org.apache.log4j.config.PropertySetter.setProperties(PropertySetter.java:104)
        at org.apache.log4j.PropertyConfigurator.parseAppender(PropertyConfigurator.java:842)
        at org.apache.log4j.PropertyConfigurator.parseCategory(PropertyConfigurator.java:768)
        at org.apache.log4j.PropertyConfigurator.parseCatsAndRenderers(PropertyConfigurator.java:672)
修改core文件配置
setting the core dump name schema specify filename and path for core dumps to permanently edit the core_pattern file
修改 /etc/sysctl.conf文件;或在/etc/sysctl.d文件夹下创建一个以.conf结尾的文件。内容为kernel.core_pattern = core.%e.%p.%h 也可以在这里直接指定目录
%e is the filename
%g is the gid the process was running under
%p is the pid of the process
%s is the signal that caused the dump
%t is the time the dump occurred
%u is the uid the process was running under
查找文件中某字符串的个数
统计一个文件中某个字符串的个数,其实就是在在一块沙地里面找石头,有的人看到石头以后,在上面做个标记(grep),然后记住自己做了多少个标记;有的人看到石头以后,把它挖了(tr:匹配不了字符串,只能去匹配单个字符),最后统计自己挖了多少石头;有的人看到石头以后,把它跳过去(awk),然后统计自己跳了多少次。
# -c只能统计一行的;-o 即使在一行也会被计算在内
cat /data/itestin-m/config/devices.xml |grep -o "</device>" |wc -l

# -v 去设定一个变量的值,RS是记录的分隔符,默认的是新行(\n)
# 就是说awk按照一行一行读数据,但是现在RS为'</device>'后,就按'</device>'读数据
# NR为已读的记录数,n个记录是被n-1个分隔符分开的,所以就是--NR
awk -v RS="</device>" 'END {print --NR}' config/devices.xml
Bad: new password is too simple
使用root用户进行密码修改即可。 sudo su; passwd username; or sudo passwd username
查看本地网关
netstat -rn
Netplan error in network definition expected mapping
Netplan error in network definition expected mapping a netplan configuration is base on yaml, when looking your configuration. i think the indentation is error because its have 3 space.
修改18.04的网卡默认名称
configure static IP address on Ubuntu 18.04 How to Configure Network Static IP Address in Ubuntu 18.04 Ubuntu 18.04 网卡配置IP
编辑 /etc/netplan/文件夹下的 /etc/netplan/01-network-manager-all.yaml (最后的文件名可能不同)。然后执行 netplan apply命令立即生效
# This file describes the network interfaces available on your system
# For more information, see netplan(5).
network:
  version: 2
  renderer: networkd
  ethernets:
    enp0s3:
      dhcp4: yes
    enp0s8:
      dhcp4: no
      dhcp6: no
      # /24意味着掩码为 255.255.255.0
      addresses: [192.168.56.110/24, ]
      gateway4:  192.168.56.1
      nameservers:
              addresses: [8.8.8.8, 8.8.4.4]
表示掩码用二进制表示时1的位数 比如/24表示11111111.11111111.11111111.00000000,就是255.255.255.0
修改16.04的网卡默认名称
#1. ip a 或 ifconig查看网卡
#2. 查看eth名称变化
root@ubuntu:~# dmesg |grep -i eth
[    3.012281] r8169 Gigabit Ethernet driver 2.3LK-NAPI loaded
[    3.014877] r8169 0000:02:00.0 eth0: RTL8168evl/8111evl at 0xffffc90000646000, 74:d4:35:23:0f:2b, XID 0c900800 IRQ 24
[    3.016230] r8169 0000:02:00.0 eth0: jumbo features [frames: 9200 bytes, tx checksumming: ko]
[    3.090803] r8169 0000:02:00.0 enp2s0: renamed from eth0

#3. 编辑文件 etc/default/grub
# 修改 GRUB_CMDLINE_LINUX="" 为 GRUB_CMDLINE_LINUX="net.ifnames=0 biosdevname=0"

#4. 生成新grub配置文件(该文件可能已经存在)
sudo grub-mkconfig -o /boot/grub/grub.cfg

#
# DO NOT EDIT THIS FILE
#
# It is automatically generated by grub-mkconfig using templates
# from /etc/grub.d and settings from /etc/default/grub
#

#5.编辑静态ip配置,如果是DHCP设置ip,则可以忽略此步
/etc/network/interfaces


# This file describes the network interfaces available on your system
# and how to activate them. For more information, see interfaces(5).

source /etc/network/interfaces.d/*

# The loopback network interface
auto lo
iface lo inet loopback

# The primary network interface
auto eth0
iface eth0 inet static
    address 10.34.16.93
    netmask 255.255.255.0
    network 10.34.16.0
    broadcast 10.34.16.255
    gateway 10.34.16.1
    # dns-* options are implemented by the resolvconf package, if installed
    dns-nameservers 114.114.114.114

#6. 需要重启生效

#7. 批量处理上述业务的脚本
#!/bin/bash

oldname=$(ifconfig |grep HWaddr |awk '{print $1}')

sed -i "s/GRUB_CMDLINE_LINUX=\"\"/GRUB_CMDLINE_LINUX=\"net.ifnames=0 biosdevname=0\"/g" /etc/default/grub

grub-mkconfig -o /boot/grub/grub.cfg

sed -i "s/$oldname/eth0/g" /etc/network/interfaces
echo 换行
# -e 参数将解析换行符,以及变量值的实际值
root@ubuntu:~# echo -e 'text\ntest'
text
test

# 更新profile
 echo 'export JAVA_HOME=/usr/lib/jvm/java-8-openjdk-amd64'>>/etc/profile; echo 'export JRE_HOME=${JAVA_HOME}/jre'>>/etc/profile;echo 'export CLASSPATH=.:${JAVA_HOME}/lib:${JRE_HOME}/lib'>>/etc/profile;echo 'export PATH=${JAVA_HOME}/bin:$PATH'>>/etc/profile
配置定时任务 crontab
查看crontab的log信息: /var/log/cron或 /var/log/syslog
minute hour day month week command
其中:
minute: 表示分钟,可以是从0到59之间的任何整数。
hour:表示小时,可以是从0到23之间的任何整数。
day:表示日期,可以是从1到31之间的任何整数。
month:表示月份,可以是从1到12之间的任何整数。
week:表示星期几,可以是从0到7之间的任何整数,这里的0或7代表星期日。
command:要执行的命令,可以是系统命令,也可以是自己编写的脚本文件。
星号(*):代表所有可能的值,
例如month字段如果是星号,则表示在满足其它字段的制约条件后每月都执行该命令操作。

逗号(,):可以用逗号隔开的值指定一个列表范围,
例如,“1,2,5,7,8,9”

中杠(-):可以用整数之间的中杠表示一个整数范围,
例如“2-6”表示“2,3,4,5,6”

正斜线(/):可以用正斜线指定时间的间隔频率,
例如“0-23/2”表示每两小时执行一次。
同时正斜线可以和星号一起使用,例如*/10,如果用在minute字段,表示每十分钟执行一次。

# crontab -e to edit this file via root user.
 crontab -l
# Edit this file to introduce tasks to be run by cron.
#
# Each task to run has to be defined through a single line
# indicating with different fields when the task will be run
# and what command to run for the task
#
# To define the time you can provide concrete values for
# minute (m), hour (h), day of month (dom), month (mon),
# and day of week (dow) or use '*' in these fields (for 'any').#
# Notice that tasks will be started based on the cron's system
# daemon's notion of time and timezones.
#
# Output of the crontab jobs (including errors) is sent through
# email to the user the crontab file belongs to (unless redirected).
#
# For example, you can run a backup of all your user accounts
# at 5 a.m every week with:
# 0 5 * * 1 tar -zcf /var/backups/home.tgz /home/
#
# For more information see the manual pages of crontab(5) and cron(8)
#
# m h  dom mon dow   command
Make shell execute by dobule click
How to make a shell file execute by double click
To run your script by double clicking on its icon, you will need to create a .desktop file for it:
[Desktop Entry]
Name=My script
Comment=Test hello world script
Exec=/home/user/yourscript.sh
Icon=/home/user/youricon.gif
Terminal=false
Type=Application
Save the above as a file on your Desktop with a .desktop extension. Change /home/user/yourscript.sh and /home/user/youricon.gif to the paths of your script and whichever icon you want it ot have respectively and then you’ll be able to launch by double clicking it.
make yourscript.sh executable, and use it to run the actual script. such as:
#!/bin/bash
cd /home/user/Desktop/plus/
echo "to start"
exec ./run.sh
Ubuntu 显示桌面快捷键 ctrl+win+D
ubuntu 18.04 启动自动的拼音输入法
英文页面进行安装。需要先安装输入法 sudo apt-get install ibus-pinyin
然后在 settings 的 Region & Language 的 Input Sources设置栏中
- 点击
Manage Installed Language,初次进入会安装些字体等相关信息。重启后使之生效。 - 点击 + 添加
Chinese(Intelligent Pinyin)。重启后使之生效。
在中文输入情况下,Shift键可以切换简繁体
CentOS Another app is currently holding the yum lock; waiting for it to exit…
Another app is currently holding the yum lock; waiting for it to exit...
  The other application is: PackageKit
    Memory :  31 M RSS (348 MB VSZ)
    Started: Wed Feb 14 20:49:26 2018 - 02:02 ago
    State  : Running, pid: 18008
- 查找运行yum的pid,kill后再强制删除对应的pid文件
rm -f /var/run/yum.pid
安装ubuntu
1. 识别U盘,
2. 选择MBR分区方案用于BIOS或UEFI模式(MBR partition scheme for UEFI)
3. 文件系统选择FAT32、簇大小8192字节
4. 点击光盘icon,选择镜像文件,创建iso镜像
vmware player安装vmware tools
提示“正在进行简易安装时,无法手动启动 vmware tools 安装”。
解决:
- 在虚拟机配置中,将CD/DVD中的镜像移除,修改为“使用物理设备”。 然后重新选择安装vmware tools工具。——会将此工具自动挂载到CD中。
- 进入此目录,将对应的gz包复制到本地工作目录,解压后执行
./vmware-install.pl根据提示处理即可
提示找不到 ipconfig、gcc等,需要安装对应的工具。
sudo apt update
# for ipconfig
sudo apt install net-tools
# for gcc
sudo apt install build-essential
# check gcc version
gcc --version

# check system version for gcc
cat /proc/version
Linux version 4.15.0-22-generic (buildd@lgw01-amd64-013) (gcc version 7.3.0 (Ubuntu 7.3.0-16ubuntu3)) #24-Ubuntu SMP Wed May 16 12:15:17 UTC 2018
# this means you need gcc 7.3 version

gcc --version
gcc (Ubuntu 7.3.0-16ubuntu3) 7.3.0
Copyright (C) 2017 Free Software Foundation, Inc.
This is free software; see the source for copying conditions.  There is NO
warranty; not even for MERCHANTABILITY or FITNESS FOR A PARTICULAR PURPOSE.
Linux下adb不能识别Android设备
Linux下adb不能识别Android设备 adb连接不上android手机的终极解决方案
利用 lsusb 获取usb设备的vendor信息、将此信息添加到 ~/.android/adb_usb.ini 文件下(文件不存在则手动创建)
但 lsusb 本身就获取不到设备就尴尬了
root@testin-MS-7788:~/.android# lsusb
Bus 002 Device 039: ID 093a:2510 Pixart Imaging, Inc. Optical Mouse
Bus 002 Device 006: ID 1a40:0201 Terminus Technology Inc. FE 2.1 7-port Hub
Bus 002 Device 004: ID 1a40:0101 Terminus Technology Inc. Hub
Bus 002 Device 051: ID 2b0e:179d
Bus 002 Device 002: ID 8087:0024 Intel Corp. Integrated Rate Matching Hub
Bus 002 Device 001: ID 1d6b:0002 Linux Foundation 2.0 root hub
Bus 001 Device 051: ID 1a40:0201 Terminus Technology Inc. FE 2.1 7-port Hub
Bus 001 Device 050: ID 1a40:0101 Terminus Technology Inc. Hub
Bus 001 Device 002: ID 8087:0024 Intel Corp. Integrated Rate Matching Hub
Bus 001 Device 001: ID 1d6b:0002 Linux Foundation 2.0 root hub
root@testin-MS-7788:~/.android#
root@testin-MS-7788:~/.android#
root@testin-MS-7788:~/.android#
root@testin-MS-7788:~/.android# adb devices -l
List of devices attached
LP036878A7130052555[usb#2-1.4]          device usb:2-1.4 product:X7_CN model:LEX651 device:le_x7

root@testin-MS-7788:~/.android# adb devices -l
List of devices attached

root@testin-MS-7788:~/.android# lsusb
Bus 002 Device 039: ID 093a:2510 Pixart Imaging, Inc. Optical Mouse
Bus 002 Device 006: ID 1a40:0201 Terminus Technology Inc. FE 2.1 7-port Hub
Bus 002 Device 004: ID 1a40:0101 Terminus Technology Inc. Hub
Bus 002 Device 002: ID 8087:0024 Intel Corp. Integrated Rate Matching Hub
Bus 002 Device 001: ID 1d6b:0002 Linux Foundation 2.0 root hub
Bus 001 Device 051: ID 1a40:0201 Terminus Technology Inc. FE 2.1 7-port Hub
Bus 001 Device 050: ID 1a40:0101 Terminus Technology Inc. Hub
Bus 001 Device 002: ID 8087:0024 Intel Corp. Integrated Rate Matching Hub
Bus 001 Device 001: ID 1d6b:0002 Linux Foundation 2.0 root hub
tar命令基本操作
#打包
# -c Create a new archive containing the specified items.
# -z (c mode only) Compress the resulting archive with gzip(1). 使用此参数将丢失原始文件的修改时间戳
# -v Produce verbose output.
# -f Read the archive from or write the archive to the specified file.
tar -czvf ycdh.tar.gz ycdh.jar ycdh_lib tools config log4j.properties build.properties dh.sh noLog.sh updateself.sh

# 打包排除指定目录,例如 tomcat压缩 排除logs和libs两个目录和test.txt文件,注意目录最终不带分隔符
tar -czvf tomcat.tar.gz --exclude=tomcat/logs --exclude=tomcat/libs --exclude=tomcat/test.txt tomcat


#查看文件,但不解压
tar -tzvf ycdh.tar.gz

#解压
# -x  Extract to disk from the archive.
#     If a file with the same name appears more than once in the archive, each copy
#     will be extracted, with later copies overwriting (replacing) earlier copies.
#
tar -zxvf ycdh.tar.gz;

# 解压到指定目录,目录需要已存在
# -C In c and r mode, this changes the directory before adding the following files.  In x mode, change directories
#             after opening the archive but before extracting entries from the archive.
tar -xf archive.tar -C /target/directory
ubuntu多版本java支持
使用ppa/源方式安装
- 添加ppa
sudo add-apt-repository ppa:webupd8team/java
sudo apt-get update
- 安装oracle-java-installer
sudo apt-get install oracle-java6-installer
sudo apt-get install oracle-java7-installer
sudo apt-get install oracle-java8-installer
查看java多版本
sudo update-java-alternatives -l
切换到其它java版本
sudo update-java-alternatives -s java-8-oracle
设置时区
# 安装ntp,非必要
apt-get install ntp

# tzselect timezone
tzselct
# then select your timezone
date -R # to check the result.

cp /usr/share/zoneinfo/Asia/Shanghai /etc/localtime # make it permenent.
ubuntu14.04上提示错误:
#ubuntu14.04的一个bug
$ tzselect
/usr/bin/tzselect: line 171:/home/ubuntu/iso3166.tab: No such file or  directory
/usr/bin/tzselect: time zone files are not set up correctly

#解决办法:
vim /usr/bin/tzselect
${TZDIR=`pwd`}
改为
${TZDIR=/usr/share/zoneinfo}
设置时间
# date命令将日期设置为2014年6月18日
date -s 06/18/14

# 将时间设置为14点20分50秒
date -s 14:20:50

# 将时间设置为2014年6月18日14点16分30秒(MMDDhhmmYYYY.ss)
date 0618141614.30
查看启动时间
#  查看最后一次系统启动的时间
gebitang@ubuntu# who -b
         system boot  2017-09-19 16:25
gebitang@ubuntu# who -r
         run-level 5  2017-09-19 16:25
gebitang@ubuntu# last reboot
reboot   system boot  4.4.0-62-generic Tue Sep 19 16:25   still running
reboot   system boot  4.4.0-62-generic Tue Sep 19 14:56   still running
reboot   system boot  4.4.0-62-generic Tue Sep 19 20:12   still running
reboot   system boot  4.4.0-62-generic Tue Sep 19 18:50   still running
# top命令的提示信息中也有
16.04root密码及用户管理
- 默认root密码是随机的,即每次开机都有一个新的root密码
- 在终端输命令 sudo passwd,然后输入当前用户的密码
- 输入新的密码并确认,此时的密码就是root新密码
- 修改成功后,输入命令 su root,再输入新的密码
用户管理
root权限,更多信息,参考
/etc/group 的内容包括用户组(Group)、用户组口令、GID及该用户组所包含的用户(User),每个用户组一条记录;格式如下:
group_name:passwd:GID:user_list
在/etc/group 中的每条记录分四个字段:〔用户组名称〕:〔用户组密码〕:〔GID〕:〔用户列表〕
useradd 添加用户
(也可以使用adduser)用来创建新的用户帐号。参数:
-d 设置新用户的登陆目录
-e 设置新用户的停止日期,日期格式为MM/DD/YY
-f 帐户过期几日后永久停权。当值为0时帐号则立刻被停权。而当值为-1时则关闭此功能。预设值为-1
-g 使新用户加入群组
-G 使新用户加入一个新组。每个群组使用逗号“,”隔开,不可以夹杂空白字
-s 指定新用户的登陆Shell
-u 设定新用户的ID值
如:useradd gebitang -d /home/gebitang -u 525 -s /bin/bash 默认新用户就在自己同名的组里
成功创建一个新用户以后,在/etc/passwd文件中就会增加一行该用户的信息,其格式如下:
〔用户名〕:〔密码〕:〔UID〕:〔GID〕:〔身份描述〕:〔主目录〕:〔登陆Shell〕
其中个字段被冒号“:”分成7各部分。
由于小于500的UID和GID一般都是系统自己保留,不用做普通用户和组的标志,
新增加的用户和组一般都是UID和GID大于500的。
可以使用usermod修改用户的信息,如: usermod –d/home/user2 –s/bin/bash user2 使用-s /sbin/nologin表示不用于登录
用户组操作,to add the user geek to the group sudo , use the following command:
usermod -a -G sudo geek

#查看用户所属的组
groups
- 查看当前用户
whoami - 查看当前用户所属用户组信息
groupsorgroups username - 指定用户所属用户组的详细信息
id -a username
#查看当前登录用户,需要root权限 w
# 第一列是用户名,
# 第二列是连接的终端,tty表示显示器,pts表示远程连接,
# 第三列是登陆时间,
root@localhost:~# w
 10:48:38 up 17 days, 19:06,  1 user,  load average: 0.00, 0.02, 0.05
USER     TTY      FROM              LOGIN@   IDLE   JCPU   PCPU WHAT
root     pts/0    10.32.22.66      10:10    6.00s  0.15s  0.00s w

# 踢掉在线用户
pkill -kill -t pts/0

# 查看登陆用户历史
node8:/ # last
root     pts/0        10.35.0.4        Fri Jan 19 15:20   still logged in
home   pts/0        10.34.18.238     Mon Jan  8 08:08 - 08:28  (00:20)
root     pts/0        10.35.0.4        Thu Jan  4 15:39 - 15:41  (00:01)

# 新建用户
注新建用户时需要确保对应的用户目录已经存在。删除用户可以在root用户下执行 userdel username
passwd 修改密码
新用户需要制定密码才可以登录。 passwd gebitang
根据系统的提示信息输入两次密码,系统会显示:
passwd ::all authentication tokens updated successfully
删除用户: userdel -r gebitang -r将用户目录下的文档一并删除。在其他位置上的文档也将一一找出并删除。
新建群组:groupadd -g 555 testgroup
删除群组: groupdel testgroup
增加用户的root权限
- 切换到root用户
- 添加文件写权限
chmod u+w /etc/sudoers - 编辑,增加新用户到该文件中
geb ALL=(ALL:ALL) ALL - 撤销写权限
chmod u-w /etc/sudoers
权限755 644说明
使用3x3方式表示权限;第一组3位表示当前用户;第二组3位表示用户所在的组;第三组3位表示其他人;
每组的3位使用二进制表示对应R(read),W(write),X(execute)权限
- 644 : 110 (rw-) for user; 100 (r–) for group while 100 (r–) for others
- 755 : 111 (rwx) for user; 101 (r-x) for group while 101 (r-x) for others
assigning read/write privileges for a folder to a user in CentOS 7
The User class - a.k.a. UGO The Mode class - a.k.a. RWX
- User (u): The owner of file
- Group (g): Other user who are in group (to access files)
- Other (o): Everyone else
 UGO    UGO    UGO    UGO
 ------------------------
 111    110    101    100
  7      6      5      4

# ls -al
# 0777
 U  G  O
-----------
-rwxrwxrwx   owner  group  file-count  date  filename

# 0644
 U  G  O
-----------
-rw-r--r--   owner  group  file-count  date  filename
通常来说,owner拥有文件目录的所有权限(rwx),所以最简单的就是修改目录的owner chown someusername /somefolder
Birth of Unix Circa 1969 -1974(The Evolution of the Unix Time-sharing System) on a discarded DEC PDP-7(The Strange Birth and Long Life of Unix) (see photo and history)
命令行快捷键
#光标移到行首, 辅助:Ctrl All必须从头开始
Ctrl + A
#光标移到行尾, E represents end
Ctrl + E

#向前移动一个字符 forward;在vim环境——包括man command也是vim环境——中,则表示向下翻页
Ctrl + F
#向后移动一个字符 backward 在vim环境——包括man command也是vim环境——中,则表示向上翻页
Ctrl + B

#向前移动一个单词 辅助:Alt意味着alternative取舍,选择。所以是按照有意义的操作进行
Alt + F
#向后移动一个单词
Alt + B
强制清空命令行已有数据 ctlr + c
配置DNS服务器
- 修改DNS
- 锁定配置文件
# 添加 阿里的dns 223.5.5.5与223.6.6.6
sudo vi /etc/resolv.conf

# Dynamic resolv.conf(5) file for glibc resolver(3) generated by resolvconf(8)
#     DO NOT EDIT THIS FILE BY HAND -- YOUR CHANGES WILL BE OVERWRITTEN
#nameserver 127.0.1.1
nameserver 223.5.5.5
nameserver 223.6.6.6

#  chattr - change file attributes on a Linux file system
sudo chattr +i /etc/resolv.conf

#解锁 man chattr for details.
sudo chattr -i /etc/resolv.conf
查看系统版本
通用方式:
uname -acat /proc/versioncat /etc/os-release- 通过 dmesg进行过滤,不建议直接使用。常用的linux命令Index of Linux Commands
uname支持不同的参数打印不同的值;uname -a打印所有信息,以下列顺序进行打印,也可以分别指向下列参数获取各自的值
-s内核名称,例如Linux-n本机名称,例如my-geb-r内核release版本,例如3.10.0-1127.19.1.el7.x86_64,5.4.0-48-generic,具体版本可以查看kernel.org-v内核version,相当于发行日期?例如#1 SMP Wed Sep 26 15:12:11 UTC 2018-m机器硬件名称,例如x86_64-p处理器类型,例如x86_64或unknown-i硬件平台,例如x86_64或unknown
#---------------on CentOS
$ uname -a
Linux g1-qa-biggrok-01 3.10.0-1127.19.1.el7.x86_64 #1 SMP Tue Aug 25 17:23:54 UTC 2020 x86_64 x86_64 x86_64 GNU/Linux

$ cat /proc/version
Linux version 3.10.0-1127.19.1.el7.x86_64 (mockbuild@kbuilder.bsys.centos.org) (gcc version 4.8.5 20150623 (Red Hat 4.8.5-39) (GCC) ) #1 SMP Tue Aug 25 17:23:54 UTC 2020

$ cat /etc/os-release
NAME="CentOS Linux"
VERSION="7 (Core)"
ID="centos"
ID_LIKE="rhel fedora"
VERSION_ID="7"
PRETTY_NAME="CentOS Linux 7 (Core)"
ANSI_COLOR="0;31"
CPE_NAME="cpe:/o:centos:centos:7"
HOME_URL="https://www.centos.org/"
BUG_REPORT_URL="https://bugs.centos.org/"

CENTOS_MANTISBT_PROJECT="CentOS-7"
CENTOS_MANTISBT_PROJECT_VERSION="7"
REDHAT_SUPPORT_PRODUCT="centos"
REDHAT_SUPPORT_PRODUCT_VERSION="7"

#---------------on Ubuntu

~ uname -a
Linux guazistf 5.4.0-48-generic #52~18.04.1-Ubuntu SMP Thu Sep 10 12:50:22 UTC 2020 x86_64 x86_64 x86_64 GNU/Linux

~ cat /proc/version
Linux version 5.4.0-48-generic (buildd@lcy01-amd64-023) (gcc version 7.5.0 (Ubuntu 7.5.0-3ubuntu1~18.04)) #52~18.04.1-Ubuntu SMP Thu Sep 10 12:50:22 UTC 2020

~ cat /etc/os-release
NAME="Ubuntu"
VERSION="18.04.3 LTS (Bionic Beaver)"
ID=ubuntu
ID_LIKE=debian
PRETTY_NAME="Ubuntu 18.04.3 LTS"
VERSION_ID="18.04"
HOME_URL="https://www.ubuntu.com/"
SUPPORT_URL="https://help.ubuntu.com/"
BUG_REPORT_URL="https://bugs.launchpad.net/ubuntu/"
PRIVACY_POLICY_URL="https://www.ubuntu.com/legal/terms-and-policies/privacy-policy"
VERSION_CODENAME=bionic
UBUNTU_CODENAME=bionic
个性方式:
ubuntu:lsb_release -a
centOS: hostnamectl
# on Ubuntu
> lsb_release -a
LSB Version:    core-9.20170808ubuntu1-noarch:security-9.20170808ubuntu1-noarch
Distributor ID: Ubuntu
Description:    Ubuntu 18.04.3 LTS
Release:        18.04
Codename:       bionic

# on CentOS
> hostnamectl
   Static hostname: g1-qa-biggrok-01
         Icon name: computer-server
           Chassis: server
        Machine ID: e5783e20f48c4e709dc17d6065f51055
           Boot ID: ec31320477044fc1b8d19aa1883ff3e3
  Operating System: CentOS Linux 7 (Core)
       CPE OS Name: cpe:/o:centos:centos:7
            Kernel: Linux 3.10.0-1127.19.1.el7.x86_64
      Architecture: x86-64
CentOS 7 vs CentOS 8 – Feature Comparison
内核版本(Kernel Version:)
- [CentOS6] 2.6.x-x
- [CentOS7] 3.10.x-x
- [CentOS8] 4.18.0-x
CentOS 7虚拟机修改静态IP地址
# root 权限
#修改 /etc/sysconfig/network-scripts目录下的 ifcfg-ens33文件,内容类似——
TYPE=Ethernet
PROXY_METHOD=none
BROWSER_ONLY=no
#BOOTPROTO=dhcp
BOOTPROTO=static
DEFROUTE=yes
IPV4_FAILURE_FATAL=no
IPV6INIT=yes
IPV6_AUTOCONF=yes
IPV6_DEFROUTE=yes
IPV6_FAILURE_FATAL=no
IPV6_ADDR_GEN_MODE=stable-privacy


NAME=ens33
DEVICE=ens33
ONBOOT=yes
# 指定修改后的ip地址
IPADDR=192.168.50.200
PREFIX=24
GATEWAY=192.168.50.2
DNS1=10.112.61.90

# 重启服务生效
service network restart
# ip addr 查看信息
测试I/O数据 dd
time dd bs=64k count=4k if=/dev/zero of=test
4096+0 records in
4096+0 records out
268435456 bytes (268 MB, 256 MiB) copied, 1.01641 s, 264 MB/s

real    0m1.025s
user    0m0.000s
sys     0m0.940s
强制覆盖
正常情况下使用cp -rf xxx yyy即可,但有时依然会被要求进行确认,通常这是因为cp被处理为别名cp=cp -i。这种情况下——
- 可以使用yes命令,
yes | cp -rf xxx yyy - 或者使用绝对路径
/bin/cp -rf xxx yyy
nohup 与 &
What’s the difference between nohup and ampersand
- 使用&执行命令,当命令行退出时,当前shell执行的所有命令都将收到挂断(hangup,
SIGHUP)信号。即执行的脚本会被强制退出 - 使用nohub执行时,挂断信号被nohub接受并忽略掉,所有执行的shell命令不会被挂断。除非被调用的进程重新连接了HANGUP信号(the called process reconnects the HANGUP signal)参考说明
但是,如果shell命令配置了huponexit off的选项,那么使用&执行的命令并不会在shell窗口退出后被中断。
shopt是内置的shell配置选项。直接执行可以看到当前shell有多少个选项。或通过shopt |wc查看- 可以通过
shopt -s huponexit即-s set or enable选项打开对应的选项。shopt -s查看所有打开的选项 - 可以通过
shopt -u huponexit即-u unset or disable选项关闭对应的选项。shotp -u查看所有关闭的选项 - 直接跟选项名称则查看当前选项的状态,例如
shopt huponexit
更多shopt参考How to Customize the Bash Shell With shopt
看手册,看手册,看手册。
- nohup - run a command immune to hangups, with output to a non-tty
- tty - print the file name of the terminal connected to standard input
查找网站ip
## 10086短信被劫持
~#nslookup bjmobliis.cn
Server:         127.0.1.1
Address:        127.0.1.1#53

Non-authoritative answer:
Name:   bjmobliis.cn
Address: 45.124.113.90

# ping
ping bjmobliis.cn
PING bjmobliis.cn (45.124.113.90) 56(84) bytes of data.
64 bytes from 45.124.113.90: icmp_seq=1 ttl=109 time=120 ms
64 bytes from 45.124.113.90: icmp_seq=2 ttl=109 time=128 ms
64 bytes from 45.124.113.90: icmp_seq=3 ttl=109 time=117 ms
64 bytes from 45.124.113.90: icmp_seq=4 ttl=109 time=120 ms
64 bytes from 45.124.113.90: icmp_seq=5 ttl=109 time=123 ms
64 bytes from 45.124.113.90: icmp_seq=6 ttl=109 time=119 ms
64 bytes from 45.124.113.90: icmp_seq=7 ttl=109 time=127 ms
ssh “permissions are too open” error
ssh “permissions are too open” error
# 使用私钥进行登陆
ssh -i path_to_rsa_file username@ip.address -p port_number
# 提示 0664: permissions 0664 too open.
chmod 400 path_to_rsa_file
# or
chmod 0600 path_to_rsa_file
本质上——
- 创建一对秘钥
ssh-keygen,可以使用密码保护,也可以不使用(Enter passphrase (empty for no passphrase):) - 本地保存私钥,然后将公钥上传到远程机器的对应用户地址(可以使用ssh-copy-it,也可以手动添加)
例如,将公钥保存在 /home/vip/.ssh/authorized_keys里,则可以使用vip这个用户登录。保存在其他用户目录下对应文件,则可以使用其他用户登录。每行保存一个公钥信息,可保存多个。
SSH Server安装
先创建一个root账号,命令: sudo passwd root 输入新密码 xxxxx
安装ssh server. 如果是刚安装好系统,第一步是先更新一下源。 sudo apt-get update 更新完了后,安装ssh server
检查ssh server配置,允许root用户登录:
sudo gedit /etc/ssh/sshd_config
找到PermitRootLogin = without-password改成PermitRootLogin yes 最后执行一下
# 测试可用
sudo apt-get install ssh

#或
sudo apt-get install openssh-server --fix-missing
启动 sudo service ssh start
安装oracel jdk 8
# method 1: support now.
sudo add-apt-repository ppa:webupd8team/java
sudo apt-get update
sudo apt-get install oracle-java8-installer

# method 2: 需要手动安装:下载tar包、解压、修改环境变量
wget http://some.place.to.download.tar/install/jdk-8u192-linux-x64.tar.gz
tar -zxvf jdk-8u192-linux-x64.tar.gz
mv /data/jdk1.8.0_192 /usr/lib/
卸载 java 8
sudo apt-get remove --autoremove oracle-java8-installer oracle-java10-installer
环境变量
Environment Variables, use env to check all current variables.
export JAVA_HOME=/usr/lib/jvm/java-8-openjdk-amd64
export JRE_HOME=${JAVA_HOME}/jre
export CLASSPATH=.:${JAVA_HOME}/lib:${JRE_HOME}/lib
export PATH=${JAVA_HOME}/bin:$PATH
修改 全局的 profile文件 vi /etc/profile,执行 source /etc/profile可立即生效。 查看profile的具体内容可知:实际执行的是 /etc/profile.d/目录下的所以.sh文件。
在/etc/profile文件中添加变量【对所有用户生效(永久的)】
用vim在文件/etc/profile文件中增加变量,该变量将会对Linux下所有用户有效,并且是“永久的”。
要让刚才的修改马上生效,需要执行以下代码source /etc/profile
方法二:
在用户目录下的.bash_profile文件中增加变量【对单一用户生效(永久的)】
用vim在用户目录下的.bash_profile文件中增加变量,改变量仅会对当前用户有效,并且是“永久的”。
要让刚才的修改马上生效,需要在用户目录下执行以下代码source .bash_profile
方法三:
直接运行export命令定义变量【只对当前shell(BASH)有效(临时的)】
在shell的命令行下直接使用[export 变量名=变量值]定义变量,该变量只在当前的shell(BASH)或其子shell(BASH)下是有效的,shell关闭了,变量也就失效了,再打开新shell时就没有这个变量,需要使用的话还需要重新定义。
命令行失效
修改环境变量时,最后少打了一个H,export PATH=${JAVA_HOME}/bin:$PATH变成了export PATH=${JAVA_HOME}/bin:$PAT导致所以的命令无法使用。
正常的解决方案:
- 使用绝对路径进行操作;
/usr/bin/vi /home/geb/.zshrc进行编辑 - 临时导出新的PATH路径
export PATH=/usr/local/sbin:/usr/local/bin:/sbin:/bin:/usr/sbin:/usr/bin:/root/bin然后继续操作
吓出一身冷汗
ulimit用法
-a:显示目前资源限制的设定;
-c <core文件上限>:设定core文件的最大值,单位为区块;
-d <数据节区大小>:程序数据节区的最大值,单位为KB;
-f <文件大小>:shell所能建立的最大文件,单位为区块;
-H:设定资源的硬性限制,也就是管理员所设下的限制;
-m <内存大小>:指定可使用内存的上限,单位为KB;
-n <文件数目>:指定同一时间最多可开启的文件数;
-p <缓冲区大小>:指定管道缓冲区的大小,单位512字节;
-s <堆叠大小>:指定堆叠的上限,单位为KB;
-S:设定资源的弹性限制;
-t <CPU时间>:指定CPU使用时间的上限,单位为秒;
-u <程序数目>:用户最多可开启的程序数目;
-v <虚拟内存大小>:指定可使用的虚拟内存上限,单位为KB。


[root@localhost ~]# ulimit -a
core file size          (blocks, -c) 0           #core文件的最大值为100 blocks。
data seg size           (kbytes, -d) unlimited   #进程的数据段可以任意大。
scheduling priority             (-e) 0
file size               (blocks, -f) unlimited   #文件可以任意大。
pending signals                 (-i) 98304       #最多有98304个待处理的信号。
max locked memory       (kbytes, -l) 32          #一个任务锁住的物理内存的最大值为32KB。
max memory size         (kbytes, -m) unlimited   #一个任务的常驻物理内存的最大值。
open files                      (-n) 1024        #一个任务最多可以同时打开1024的文件。
pipe size            (512 bytes, -p) 8           #管道的最大空间为4096字节。
POSIX message queues     (bytes, -q) 819200      #POSIX的消息队列的最大值为819200字节。
real-time priority              (-r) 0
stack size              (kbytes, -s) 10240       #进程的栈的最大值为10240字节。
cpu time               (seconds, -t) unlimited   #进程使用的CPU时间。
max user processes              (-u) 98304       #当前用户同时打开的进程(包括线程)的最大个数为98304。
virtual memory          (kbytes, -v) unlimited   #没有限制进程的最大地址空间。
file locks                      (-x) unlimited   #所能锁住的文件的最大个数没有限制。
lsof 打开的文件过多 / too many open files
#1. 查看进程
ps aux |grep java

#2. 查看进程打开的文件
lsof -p pid

#3. 修改ulimit条件
打开Synchrony插件之后,wiki再次出现卡死现象。
对应的配置以及场景问题——
- Configuring Synchrony
- Possible Confluence and Synchrony Configurations
- Troubleshooting Collaborative Editing
第一次,确认Nginx配置了对websocket的支持,参考How to Configure NGINX to Proxy WebSockets
今天再次出现卡死问题,保留的log中可以看到已经支持websocket链接,但报错too many open files
24-Nov-2020 14:31:19.461 Info [http-nio-8090-exec-283] org.springframework.web.socket.client.WebSocketConnectionManager.openConnection Connecting to WebSocket at ws://127.0.0.1:8091/synchrony/v1/bayeux-sync1
24-Nov-2020 14:31:19.464 Info [SimpleAsyncTaskExecutor-1] org.springframework.web.socket.client.WebSocketConnectionManager.onSuccess Successfully connected
24-Nov-2020 14:31:19.466 Info [http-nio-8090-exec-283] org.springframework.web.socket.client.WebSocketConnectionManager.stop Stopping WebSocketConnectionManager
24-Nov-2020 14:31:19.524 Info [http-nio-8090-exec-250] org.springframework.web.socket.client.WebSocketConnectionManager.startInternal Starting WebSocketConnectionManager
24-Nov-2020 14:31:19.525 Info [http-nio-8090-exec-250] org.springframework.web.socket.client.WebSocketConnectionManager.openConnection Connecting to WebSocket at ws://127.0.0.1:8091/synchrony/v1/bayeux-sync1
24-Nov-2020 14:31:19.527 Info [SimpleAsyncTaskExecutor-1] org.springframework.web.socket.client.WebSocketConnectionManager.onSuccess Successfully connected
24-Nov-2020 14:31:19.527 Info [http-nio-8090-exec-250] org.springframework.web.socket.client.WebSocketConnectionManager.stop Stopping WebSocketConnectionManager
24-Nov-2020 14:31:19.556 Info [http-nio-8090-exec-262] org.springframework.web.socket.client.WebSocketConnectionManager.startInternal Starting WebSocketConnectionManager
24-Nov-2020 14:31:19.557 Info [http-nio-8090-exec-262] org.springframework.web.socket.client.WebSocketConnectionManager.openConnection Connecting to WebSocket at ws://127.0.0.1:8091/synchrony/v1/bayeux-sync1
24-Nov-2020 14:31:19.558 Info [SimpleAsyncTaskExecutor-1] org.springframework.web.socket.client.WebSocketConnectionManager.onSuccess Successfully connected
24-Nov-2020 14:31:19.559 Info [http-nio-8090-exec-262] org.springframework.web.socket.client.WebSocketConnectionManager.stop Stopping WebSocketConnectionManager
24-Nov-2020 14:31:19.607 Error [http-nio-8090-Acceptor-0] org.apache.tomcat.util.net.Acceptor.run Socket accept failed
 java.io.IOException: too many open files
	at sun.nio.ch.ServerSocketChannelImpl.accept0(Native Method)
	at sun.nio.ch.ServerSocketChannelImpl.accept(ServerSocketChannelImpl.java:422)
	at sun.nio.ch.ServerSocketChannelImpl.accept(ServerSocketChannelImpl.java:250)
	at org.apache.tomcat.util.net.NioEndpoint.serverSocketAccept(NioEndpoint.java:446)
	at org.apache.tomcat.util.net.NioEndpoint.serverSocketAccept(NioEndpoint.java:70)
	at org.apache.tomcat.util.net.Acceptor.run(Acceptor.java:95)
	at java.lang.Thread.run(Thread.java:748)
检查ulimit -n,还是默认的设置1024;先设置大一点再说ulimit -n 65535;查看tomcat进程打开的文件数目: lsof -p pid |wc -l,已经有2000+;
系统运行打开的文件数足够大,cat /proc/sys/fs/file-max;在文件/etc/security/limits.conf中先增加以下内容——
#
#<domain>        <type>  <item>  <value>
#
#Where:
#<domain> can be:
#        - a user name
#        - a group name, with @group syntax
#        - the wildcard *, for default entry
#        - the wildcard %, can be also used with %group syntax,
#                 for maxlogin limit
#
#<type> can have the two values:
#        - "soft" for enforcing the soft limits
#        - "hard" for enforcing hard limits
#
#<item> can be one of the following:
#        - core - limits the core file size (KB)
#        - data - max data size (KB)
#        - fsize - maximum filesize (KB)
#        - memlock - max locked-in-memory address space (KB)
#        - nofile - max number of open file descriptors
#        - rss - max resident set size (KB)
#        - stack - max stack size (KB)
#        - cpu - max CPU time (MIN)
#        - nproc - max number of processes
#        - as - address space limit (KB)
#        - maxlogins - max number of logins for this user
#        - maxsyslogins - max number of logins on the system
#        - priority - the priority to run user process with
#        - locks - max number of file locks the user can hold
#        - sigpending - max number of pending signals
#        - msgqueue - max memory used by POSIX message queues (bytes)
#        - nice - max nice priority allowed to raise to values: [-20, 19]
#        - rtprio - max realtime priority

* soft nofile 65535
* hard nofile 65535
观察一段时间再说。
传说在CentOS上修改/etc/security/limits.conf不生效? 但官方似乎也是这样建议的How to set ulimit values,如果还是不行,试试 Changing Limits for Services with CentOS 7 / RHEL 7 / Systemd
针对service,可以在配置里直接进行设置,参考RHEL/CentOS 7 & systemD not honoring ulimits,类似——
首先,使用service status serviceName 或 systemctl status serviceName 确认对应服务的启动方式,是init.d还是systemd,如果是后者,在对应的服务配置的service字段中增加LimitNOFILE=65535即可生效
- 系统级:当前系统可打开的最大数量,通过fs.file-max参数可修改
- 用户级:指定用户可打开的最大数量,修改/etc/security/limits.conf
- 进程级:单个进程可打开的最大数量,通过fs.nr_open参数可修改
Shell commands
Comparison Operators Special Characters
任何场景下,使用
man command
查看命令详情
escape spaces in scp
scp user@example.com:"'web/tmp/Master File 18 10 13.xls'" .
scp user@example.com:"web/tmp/Master\ File\ 18\ 10\ 13.xls" .
scp user@example.com:web/tmp/Master\\\ File\\\ 18\\\ 10\\\ 13.xls .

# 使用反斜杠转义单引号
scp user@example.com:4:"/home/vip/Carl\ Sagan\'s\ Pale\ Blue\ Dot.mp4" .
忽略命令行错误信息
Bash ignoring error for a particular command
Just add || true after the command where you want to ignore the error.
How to Ignore Failures in a Shell Step?
#Do something that might fail but we don't care. Loop is completed.
while ...
do
    command || true
done

# Do something that might fail but we care. Loop is completed. If there was an error, the variable error is created and set to true
while ...
do
    command || error=true
done

#Fail the build if there was an error
if [ $error ]
then
    exit -1
fi
LDP
The Linux Documentation Project LDP
add text to file head
How to insert a text at the beginning of a file?
sed can operate on an address:
$ sed -i '1s/^/<added text> /' file
What is this magical 1s you see on every answer here? Line addressing!.
Want to add on the first 10 lines?
$ sed -i '1,10s/^/<added text> /' file
Or you can use Command Grouping:
$ { echo -n '<added text> '; cat file; } >file.new
$ mv file{.new,}
创建大文本文件
How to create a large file in UNIX? Quickly create a large file on a Linux system How To Quickly Generate A Large File On The Command Line
yes "Some text" | head -n 100000 > large-file
sed 查找替换冒号
sed如何转义单引号和双引号:如果外面是双引号,里面的双引号就要转义;写成",单引号则不用转义,如果外面是单引号就反过来。
# 替换 GRUB_CMDLINE_LINUX="" 为 GRUB_CMDLINE_LINUX="net.ifnames=0 biosdevname=0"
sed -i "s/GRUB_CMDLINE_LINUX=\"\"/GRUB_CMDLINE_LINUX=\"net.ifnames=0 biosdevname=0\"/g" /etc/default/grub
列出子目录内容
ls -lR 递归显示所有所有文件、文件夹内容 display all files, directories and sub directories of the current directory
ls -d * */*只展示两层深度,-d参数防止进行递归
清除“^M”
使用sed命令。和vi的用法相似:
$ sed -e ‘s/^M/\n/g’ myfile.txt
注意:这里的“^M”要使用“CTRL-V CTRL-M”生成,而不是直接键入“^M”。
使用jq格式化json
需要先安装 sudo apt install -u jq
cat config/devices.txt |jq .

{
    "brand": "360",
    "displayed": true,
    "idealName": " 10.35.16.20 [360 1703-M01] _1-5 [864848031310516 23] ",
    "imei": "864848031310516",
    "keyID": "10.35.16.20__1-5",
    "model": "1703-M01",
    "online": true,
    "position": {
      "column": 7,
      "row": 2
}
收集进程的线程详细信息
#!/bin/bash
controller=$(ps -aux|grep java |grep -F "$1"|grep -vF grep|awk '{printf $0}' |awk '{print $2}')
top -b -n 1 -H -p $controller |grep Threads

# -b  :Batch-mode operation
#            Starts top in 'Batch' mode, which could be useful for sending output from top to other programs or to a file.  In this mode, top  will
#            not accept input and runs until the iterations limit you've set with the '-n' command-line option or until killed.
# -n  :Number-of-iterations limit as:  -n number
查看进程的线程信息 top & Ps
top -H -p <pid>
root@test:/root# top -H -p 12091
top - 10:33:34 up 12:58,  2 users,  load average: 14.39, 15.31, 16.61
Threads: 106 total,   4 running, 102 sleeping,   0 stopped,   0 zombie
%Cpu(s): 68.4 us,  0.4 sy,  0.0 ni,  6.3 id, 24.7 wa,  0.0 hi,  0.2 si,  0.0 st
KiB Mem : 16285716 total,   891832 free, 10665560 used,  4728324 buff/cache
KiB Swap:  2097148 total,  2097148 free,        0 used.  4740208 avail Mem

进▒ USER      PR  NI    VIRT    RES    SHR ▒ %CPU %MEM     TIME+ COMMAND
13503 root      20   0 14.222g 9.102g  26088 R 99.9 58.6 445:00.85 java
24782 root      20   0 14.222g 9.102g  26088 R 99.9 58.6 315:46.25 java
25118 root      20   0 14.222g 9.102g  26088 R 99.9 58.6 299:22.98 java
26443 root      20   0 14.222g 9.102g  26088 R 99.9 58.6 173:56.59 java
12104 root      20   0 14.222g 9.102g  26088 S 62.2 58.6 125:17.54 java
16155 root      20   0 14.222g 9.102g  26088 S  2.4 58.6   0:02.87 java
16154 root      20   0 14.222g 9.102g  26088 D  1.2 58.6   0:02.53 java
12117 root      20   0 14.222g 9.102g  26088 S  0.4 58.6   1:25.10 java
16136 root      20   0 14.222g 9.102g  26088 D  0.4 58.6   0:08.15 java
16157 root      20   0 14.222g 9.102g  26088 S  0.4 58.6   0:03.89 java
16285 root      20   0 14.222g 9.102g  26088 S  0.4 58.6   0:05.48 java
12091 root      20   0 14.222g 9.102g  26088 S  0.0 58.6   0:00.00 java
12093 root      20   0 14.222g 9.102g  26088 S  0.0 58.6   0:02.23 java
12094 root      20   0 14.222g 9.102g  26088 S  0.0 58.6   2:24.36 java
12095 root      20   0 14.222g 9.102g  26088 S  0.0 58.6   2:24.78 java
12096 root      20   0 14.222g 9.102g  26088 S  0.0 58.6   2:23.79 java
12097 root      20   0 14.222g 9.102g  26088 S  0.0 58.6   2:23.89 java
12098 root      20   0 14.222g 9.102g  26088 S  0.0 58.6   2:24.28 java
12099 root      20   0 14.222g 9.102g  26088 S  0.0 58.6   2:24.99 java
12100 root      20   0 14.222g 9.102g  26088 S  0.0 58.6   2:24.57 java
12101 root      20   0 14.222g 9.102g  26088 S  0.0 58.6   2:23.62 java
12102 root      20   0 14.222g 9.102g  26088 S  0.0 58.6   2:33.86 java
12103 root      20   0 14.222g 9.102g  26088 S  0.0 58.6   2:36.90 java
12105 root      20   0 14.222g 9.102g  26088 S  0.0 58.6   1:14.74 java
12106 root      20   0 14.222g 9.102g  26088 S  0.0 58.6   0:00.96 java
12107 root      20   0 14.222g 9.102g  26088 S  0.0 58.6   0:00.87 java
12108 root      20   0 14.222g 9.102g  26088 S  0.0 58.6   0:00.05 java
12109 root      20   0 14.222g 9.102g  26088 S  0.0 58.6   0:00.00 java
12110 root      20   0 14.222g 9.102g  26088 S  0.0 58.6   0:37.36 java
12111 root      20   0 14.222g 9.102g  26088 S  0.0 58.6   0:39.42 java
12112 root      20   0 14.222g 9.102g  26088 S  0.0 58.6   0:42.24 java
12113 root      20   0 14.222g 9.102g  26088 S  0.0 58.6   0:15.51 java
12114 root      20   0 14.222g 9.102g  26088 S  0.0 58.6   0:00.00 java
12115 root      20   0 14.222g 9.102g  26088 S  0.0 58.6   0:12.55 java
12116 root      20   0 14.222g 9.102g  26088 S  0.0 58.6  12:19.01 java
12118 root      20   0 14.222g 9.102g  26088 S  0.0 58.6   6:45.93 java
12119 root      20   0 14.222g 9.102g  26088 S  0.0 58.6   0:00.14 java
12120 root      20   0 14.222g 9.102g  26088 S  0.0 58.6   0:04.27 java
12121 root      20   0 14.222g 9.102g  26088 S  0.0 58.6   0:00.00 java
12150 root      20   0 14.222g 9.102g  26088 S  0.0 58.6   0:00.00 java
What are us, sy, ni, id, wa, hi, si and st (for CPU usage)?
- us: user cpu time (or) % CPU time spent in user space
- sy: system cpu time (or) % CPU time spent in kernel space
- ni: user nice cpu time (or) % CPU time spent on low priority processes
- id: idle cpu time (or) % CPU time spent idle
- wa: io wait cpu time (or) % CPU time spent in wait (on disk)
- hi: hardware irq (or) % CPU time spent servicing/handling hardware interrupts
- si: software irq (or) % CPU time spent servicing/handling software interrupts
- st: steal time - - % CPU time in involuntary wait by virtual cpu while hypervisor is servicing another processor (or) % CPU time stolen from a virtual machine
top - 14:54:28 up 13 days, 13 min,  0 users,  load average: 19.41, 13.56, 9.74
Tasks:   5 total,   1 running,   4 sleeping,   0 stopped,   0 zombie
%Cpu(s): 46.2 us,  5.0 sy,  0.4 ni, 47.9 id,  0.0 wa,  0.0 hi,  0.5 si,  0.0 st
KiB Mem : 15625000 total,  2836444 free,  8893532 used,  3895024 buff/cache
KiB Swap:        0 total,        0 free,        0 used.  2836444 avail Mem

  PID USER      PR  NI    VIRT    RES    SHR S  %CPU %MEM     TIME+ COMMAND
25618 root      20   0 8828860 4.112g  19816 S 803.0 27.6  23:20.23 java


    1 root      20   0 10.955g 4.169g  13880 S   0.3 28.0 369:30.07 java


20942 root      20   0   13380   1872   1436 S   0.0  0.0   0:00.02 sh
top - 14:54:28 up 13 days, 13 min, 0 users, load average: 19.41, 13.56, 9.74
- 第一块:当前系统时间
- 第二块:系统已经运行了13天13分
- 第三块:当前有0个用户登录系统(docker中启动的会有这种情况?)
- 第四块:load average后面的三个数分别是1分钟、5分钟、15分钟的负载情况。load average数据是每隔5秒钟检查一次活跃的进程数,然后按特定算法计算出的数值。如果这个数除以逻辑CPU的数量,结果高于5的时候就表明系统在超负荷运转
Tasks: 5 total, 1 running, 4 sleeping, 0 stopped, 0 zombie
- 第一块:系统现在有5个进程
- 第二块:有一个进程处于运行状态
- 第三块:4个进程处于休眠状态
- 第四块:0个进程处于stopped状态
- 第五块:0个进程处于zombie状态
%Cpu(s): 46.2 us, 5.0 sy, 0.4 ni, 47.9 id, 0.0 wa, 0.0 hi, 0.5 si, 0.0 st
- 46.2 us — 用户空间占用CPU的百分比。user space
- 5 sy — 内核空间占用CPU的百分比。 system
- 0.4 ni — 改变过优先级的进程占用CPU的百分比
- 47.9 id — 空闲CPU百分比
- 0.0 wa — IO等待占用CPU的百分比
- 0.0 hi — 硬中断(Hardware IRQ)占用CPU的百分比
- 0.5 si — 软中断(Software Interrupts)占用CPU的百分比
用户空间就是用户进程所在的内存区域,相对的,系统空间就是操作系统占据的内存区域。用户进程和系统进程的所有数据都在内存中。
KiB Mem : 15625000 total, 2836444 free, 8893532 used, 3895024 buff/cache
- 15625000 total — 物理内存总量(16GB)
- 8893532 used — 使用中的内存总量(8.9GB)
- 2836444 free — 空闲内存总量(2.8G)
- 3895024 buffers — 缓存的内存量 (3.6G)
KiB Swap: 0 total, 0 free, 0 used. 2836444 avail Mem
Swap分区:swap(类似于虚拟内存)交换分区的used,如果这个数值在不断的变化,说明内核在不断进行内存和swap的数据交换,这是可以判定服务器的内存不够用了。
看起来docker启动的没有分配任何的swap分区
PID USER PR NI VIRT RES SHR S %CPU %MEM TIME+ COMMAND
PID — 进程id
USER — 进程所有者
PR — 进程优先级
NI — nice值。负值表示高优先级,正值表示低优先级
VIRT — 进程使用的虚拟内存总量,单位kb。VIRT=SWAP+RES
RES — 进程使用的、未被换出的物理内存大小,单位kb。RES=CODE+DATA
SHR — 共享内存大小,单位kb
S — 进程状态。D=不可中断的睡眠状态 R=运行 S=睡眠 T=跟踪/停止 Z=僵尸进程
%CPU — 上次更新到现在的CPU时间占用百分比
%MEM — 进程使用的物理内存百分比
TIME+ — 进程使用的CPU时间总计,单位1/100秒
COMMAND — 进程名称(命令名/命令行)
top -Hp pid 列出进程pid所有的线程信息 类似于 ps -T -p pid
ps -mp pid -o THREAD,tid,time
通过%CPU和 TIME,判断占用的线程TID
-m Show threads after processes. -p Select by PID -o format. 自定义输出格式,例如 THREAD,tid,time
jps - Lists the instrumented Java Virtual Machines (JVMs) on the target system. This command is experimental and unsupported.
jstack pid > pid.txt 查看具体的信息
/dev/null 2>&1含义
What is /dev/null 2>&1? 2>&1>/dev/null shell中命令>/dev/null 2>&1含义
标准输出被重定向到空的设备文件,即不显示,标准错误输出被重定向到标准输出,而标准输出已被重定向到空的设备文件,所以标准错误输出也不显示。
标准输入0 从键盘获得输入 /proc/self/fd/0 标准输出1 输出到屏幕(即控制台) /proc/self/fd/1 错误输出2 输出到屏幕(即控制台) /proc/self/fd/2
例如:nohup = Run a command immune to hangups
最终命令的一般形式 nohup command >out.file 2>&1 & 这里面,“1”表示文件描述符 1,表示标准输出,“2”表示文件描述符 2,意思是标准错误输出,“2>&1”表示标准输出和错误输出合并了。合并到哪里去呢?到 out.file 里。
- 标准输入流(用 0 表示)可以作为进程执行的上下文(进程执行可以从输入流中获取数据)。
- 标准输出流(用 1 表示)中写入的结果会被打印到屏幕上。
- 如果进程在执行过程中发生异常,那么异常信息会被记录到标准错误流(用 2 表示)中。
举例:
执行ls1 > out结果并不会存入out文件,因为ls1指令是不存在的。结果会输出到标准错误流中,仍然在屏幕上。
把标准错误流也重定向到标准输出流,然后再重定向到文件。ls1 &> out这个写法等价于:ls1 > out 2>&1
把ls1的标准输出流重定向到out,因为ls1 > out出错了,所以标准错误流被定向到了标准输出流。&代表一种引用关系,具体代表的是ls1 >out的标准输出流。
在cat pipe1后面增加了一个&符号。这个&符号代表指令在后台执行,不会阻塞用户继续输入。然后我们通过echo指令往pipe1中写入东西,接着就会看到xxx被打印出来。
# 创建管道
mkfifo pipe1
# 查看管道并进入后台
cat pipe1 &
# 向管道输入数据
echo "xxx" > pipe1
mkfifo pipe1
mkfifo pipe2
echo -n run | cat - pipe1 > pipe2 &
cat <pipe2 > pipe1
split & cat使用
-b:值为每一输出档案的大小,单位为 byte。
-C:每一输出档中,单行的最大 byte 数。
-d:使用数字作为后缀。
-l:值为每一输出档的列数大小。

split -b 102400k all.log
~# ls
all.log   xaa  xab  xac  xad

cat xaa xab xac xad  >back.log
~# md5sum back.log
ab9a814d0d7f412555c48689d6037050  back.log
~# md5sum all.log
ab9a814d0d7f412555c48689d6037050  all.log
使用zsh
- 安装
sudo apt-get install zsh - 配置默认的sh
chsh -s /bin/zsh或chsh -s 'which zsh',切换为旧bashchsh -s /bin/bash - 安装 oh-my-zsh github repo
- 手动更新:
upgrade_oh_my_zsh
# curl方式
sh -c "$(curl -fsSL https://raw.githubusercontent.com/robbyrussell/oh-my-zsh/master/tools/install.sh)"

# wget 方式
sh -c "$(wget https://raw.githubusercontent.com/robbyrussell/oh-my-zsh/master/tools/install.sh -O -)"
# 忽略证书检查
wget --no-check-certificate https://example.com
关闭swap功能
- 临时关闭
sudo swapoff -a - 永久关闭
sudo vi /etc/fstab编辑swap相关的配置,注释之即可 - 检查swap状态
systemctl --type swap
端口占用
利用netstat 或fuser 命令查找
netstat -ano |grep 9988
# -k 参数可以kill相应的进程
fuser 9988/tcp
##java可利用ManagementFactory.getRuntimeMXBean().getName()获取进程
0x0. 启动terminal 快捷键
Ctrl+Alt+T
0x1. 等待
sleep 1 #睡眠1秒 默认
sleep 1s #睡眠1秒
sleep 1m #睡眠1分
sleep 1h #睡眠1小时
0x2. 日期
#%s表示当前时间的秒数,而%N表示当前时间的纳秒部分,即1秒以下的那部分
joechin@ubuntu:~$ date +%Y%m%d%H%M%S%N
20170824115956519750498
joechin@ubuntu:~$ date +%Y%m%d%H%M%S
20170824115957
0x3. 判断文件夹、进程是否存在
#!/bin/bash

# Create dir logs if it doesn't exist
if [ ! -d "./_logs" ]
then
    mkdir ./_logs
fi

# 判断是否存在文件
# ls所有以.txt为后缀的文件,如果不存在,将标准错误重定向到标准输出,
# 2>&1 的意思就是将标准错误也输出到标准输出当中。
# 重定向中 0-标准输出,1-标准输出,2-标准错误,而No such file or directory是一个标准错误。
if ls *.txt >/dev/null 2>&1; then
  echo "file exist."
else
    echo "no txt file"
fi

controller=$(ps -aux|grep -F "ycdh"|grep -vF grep|awk '{printf $0}' |awk '{print $2}')

# 中括号前后必须有空格,否则报 [: missing `]' 错误
# 需要两个中括号,因为当变量为空时,会报 "[: =: unary operator expected" 错误
if [[ $controller -ne 0 ]] ; then
   echo "try to kill $controller"
   kill -9 $controller
else
  echo "ycdh not running."
fi
#!/bin/sh

myPath="/var/log/httpd/"
myFile="/var /log/httpd/access.log"

#这里的-x 参数判断$myPath是否存在并且是否具有可执行权限
if [ ! -x "$myPath"]; then
  mkdir "$myPath"
fi

#这里的-d 参数判断$myPath是否存在
if [ ! -d "$myPath"]; then
  mkdir "$myPath"
fi

#这里的-f参数判断$myFile是否存在
if [ ! -f "$myFile" ]; then
  touch "$myFile"
fi

#其他参数还有-n,-n是判断一个变量是否是否有值
if [ ! -n "$myVar" ]; then
  echo "$myVar is empty"
  exit 0
fi

#两个变量判断是否相等
if [ "$var1" = "$var2" ]; then
  echo '$var1 eq $var2'
else
  echo '$var1 not eq $var2'
fi


-e filename  如果 filename存在,则为真  [ -e /var/log/syslog ]
-d filename  如果 filename为目录,则为真  [ -d /tmp/mydir ]
-f filename  如果 filename为常规文件,则为真  [ -f /usr/bin/grep ]
-L filename  如果 filename为符号链接,则为真  [ -L /usr/bin/grep ]
-r filename  如果 filename可读,则为真  [ -r /var/log/syslog ]
-w filename  如果 filename可写,则为真  [ -w /var/mytmp.txt ]
-x filename  如果 filename可执行,则为真  [ -L /usr/bin/grep ]
filename1-nt filename2  如果 filename1比 filename2新,则为真
 [ /tmp/install/etc/services -nt /etc/services ]
filename1-ot filename2  如果 filename1比 filename2旧,则为真
 [ /boot/bzImage -ot arch/i386/boot/bzImage ]


# http://www.tldp.org/LDP/abs/html/abs-guide.html
if [ -n "$1" ]
# Test whether command-line argument is present (non-empty).
then
  lines=$1
else
  lines=$LINES # Default, if not specified on command-line.
fi
0x4. 线程控制批量执行
- 循环体的命令用&符号放入后台运行实现多线程效果
- 利用有名管道特性实现线程控制
#!/bin/bash
# must /bin/bash add method not work while using /bin/sh

# http://www.cnblogs.com/chenjiahe/p/6268853.html
#定义脚本运行的开始时间
start_time=`date +%s`
# need to make sure root user can remote login
passwd='passwordForRoot'
#创建有名管道
[ -e /tmp/fd1 ] || mkfifo /tmp/fd1
#创建文件描述符,以可读(<)可写(>)的方式关联管道文件,文件描述符9就有了有名管道文件的所有特性
#has to be number?
exec 9<>/tmp/fd1
#关联后的文件描述符拥有管道文件的所有特性,所以这时候管道文件可以删除,留下文件描述符即可
rm -rf /tmp/fd1
for ((i=1;i<=5;i++))
do
#&9代表引用文件描述符9,这条命令代表往管道里面放入了一个"令牌"
    echo >&9
done

for ip in 10.34.16.25 10.34.16.27 10.34.7.200
do
#代表从管道中读取一个令牌
read -u9
{
	if ping -c 1 -W 5 $ip > /dev/null;then
			#http://www.cnblogs.com/autopenguin/p/5918717.html
			/usr/bin/expect <<-EOF
			set timeout -1

			spawn ssh root@$ip "cd /data/itestin-m/; bash /data/itestin-m/dh.sh"
			expect {
					"*yes/no" { send "yes\r"; exp_continue }
					"*password:" { send "$passwd\r" }
			}
			expect eof

			EOF
			echo -e "~~~~good $ip~~~\n"
	else
			echo -e "=====can't connect@@@@$ip==\n\n"
	fi
	#代表命令执行到最后,把令牌放回管道
	echo >&9
}&
done
wait

stop_time=`date +%s`  #定义脚本运行的结束时间

echo "TIME:`expr $stop_time - $start_time`"
#关闭文件描述符的读,必须分开写
exec 9<&-
#关闭文件描述符的写
exec 9>&-
0x5. 过滤logcat输出并保存到文件
#使用 --line-buffered 参数 https://stackoverflow.com/a/18146279/1087122
adb logcat -v time | grep --line-buffered UIA > log.log
0x6. 查看端口占有
# 查看已经连接的服务端口(ESTABLISHED)
netstat -a

#查看所有的服务端口(LISTEN,ESTABLISHED)
netstat -ap

# 查看具体哪个进程占有对应的端口,端口号为特指
lsof -i:9988
Netstat Commands for Linux Network Management
0x7. apt-get安装卸载
# 查看已安装应用 dpkg -l配合grep
dpkg -l |grep 'deja-dup'

# 卸载应用 -q for quiet, 可以通过 man apt-get 搜索 -qq查看更多信息
apt-get -q remove deja-dup
0x8. Shell接受参数 $@
linux中shell变量$#,$@,$0,$1,$2的含义解释
- $$ Shell本身的PID(ProcessID)
- $! Shell最后运行的后台Process的PID
- $? 最后运行的命令的结束代码(返回值)
- $- 使用Set命令设定的Flag一览
- $* 所有参数列表。如"$*“用「"」括起来的情况、以”$1 $2 … $n"的形式输出所有参数。
- $@ 所有参数列表。如"$@“用「"」括起来的情况、以”$1" “$2” … “$n” 的形式输出所有参数。
- $# 添加到Shell的参数个数
- $0 Shell本身的文件名
- $1~$n 添加到Shell的各参数值。$1是第1参数、$2是第2参数…。
接收来自命令行传入的参数,第一个参数用$1表示,第二个参数$2表示,。。。以此类推。注意:$0表示脚本文件名。另外一个在shell编程中经常用到 的是“$@”这个代表所有的参数,。你可以用一个循环来遍历这个参数。如果用java来类比的话,可以把$@看作是man函数中定义的那个数组
#!/bin/bash
for args in $@
  do
  	echo $args
  done
0x9. Shell自动登录expect
# 需要安装expect
#!/usr/bin/expect
spawn ssh root@192.168.22.194
expect "*password:"
send "123\r"
expect "*#"
interact
0xa. for循环读取文件作为变量
for line in `cat filename`
do
  echo $line
done
可配合上面的使用,变量单独存在文件中
0xb. 查找包含某字符的所有文件
grep -rn "word to find" *
# * 表示当前目录所有文件,支持通配符
# -r 递归查找
# -n 显示行号
# -R 查找当前目录的所有子目录, 深递归
# -i 忽略大小写
0xc. 显示n到m行的文件内容,或n到结尾的内容
sed -n '100, 150p' path/to/filename

sed '100,$!d' path/to/filename
#或
sed '100,$!p' path/to/filename
0xd. shell中调用另外一个shell脚本
fork方式为直接执行,直接写被调用脚本的路径即可。在子命令执行完后再执行父级命令。子级的环境变量不会影响到父级。./my.sh是fork的方法execpath/to/call/script.sh 执行子级的命令后,不再执行父级命令sourcepath/to/call/sciprt.sh 执行子级命令后继续执行父级命令,同时子级设置的环境变量会影响到父级的环境变量。source my.sh和. my.sh(点加空格加脚本文件)是source的方法。修改环境变量生效的原理正是利用了【子级设置的环境变量会影响到父级的环境变量】的效果。先执行.bashrc脚本,然后将其中设置的环境变量信息“带回”到当前的“父级”环境中
0xe. awk基本使用
读入有’\n’换行符分割的一条记录,然后将记录按指定的域分隔符划分域,填充域,$0则表示所有域,$1表示第一个域,$n表示第n个域。默认域分隔符是"空白键" 或 “[tab]键”
可以使用 -F 指定分割符合
awk -F: '{print $7}' /etc/passwd
# root:x:0:0:root:/root:/bin/bash
/bin/bash
# 以:为分隔符,打印第7个,所有输出 /bin/bash
0xf. du -h 查看文件具体大小
df命令可以显示目前所有文件系统的可用空间及使用情形
du:查询文件或文件夹的磁盘使用空间
test@pp:/data/itestin-m# du -h --max-depth=1 .
4.0K	./auto_update
386M	./tools
861M	./data
1.6G	./logs
18G	./download
1.3G	./temp
4.0K	./user
340K	./config
91M	./ycdh_lib
4.0K	./script
4.0K	./tmpp
4.0K	./report
6.2G	./_logs
29G	.
soft lockup
Message from syslogd@master at Apr 24 23:57:33 … kernel:watchdog: BUG: soft lockup - CPU#1 stuck for 1747s! [kube-apiserver:22771]
原因:CPU陷入内核模式超过10秒没有跳出执行其他任务,watchdog将发生这个消息。
A ‘soft lockup’ is defined as a bug that causes the kernel to loop in kernel mode for more than 20 seconds without giving other tasks a chance to run. The watchdog daemon will send an non-maskable interrupt (NMI) to all CPUs in the system who, in turn, print the stack traces of their currently running tasks.
grep 之后只显示部分行数 grep ’’ | head -200
处理 Binary file xxx.log matches
grep认为这是二进制文件,解决方案:grep -a
cat log-20171218074617.txt |grep -a c33a1478fa479153124f938541022398
dig查看域名解析
dig qq.com +nostats +nocomments +nocmd

; <<>> DiG 9.9.7-P3 <<>> qq.com +nostats +nocomments +nocmd
;; global options: +cmd
;qq.com.				IN	A
qq.com.			600	IN	A	125.39.240.113
qq.com.			600	IN	A	61.135.157.156
qq.com.			17879	IN	NS	ns4.qq.com.
qq.com.			17879	IN	NS	ns2.qq.com.
qq.com.			17879	IN	NS	ns1.qq.com.
qq.com.			17879	IN	NS	ns3.qq.com.
ns1.qq.com.		3706	IN	A	101.226.68.138
ns1.qq.com.		3706	IN	A	14.17.19.139
ns2.qq.com.		18704	IN	A	101.227.169.106
ns3.qq.com.		106736	IN	A	182.140.177.149
ns3.qq.com.		106736	IN	A	182.140.167.157
ns4.qq.com.		106736	IN	A	123.151.178.115
ns4.qq.com.		106736	IN	A	125.39.247.247
ns4.qq.com.		106736	IN	A	184.105.206.124
ns4.qq.com.		106736	IN	A	203.205.144.156
统计当前文件夹下文件的个数
#1、 统计当前文件夹下文件的个数
ls -l |grep "^-"|wc -l

#2、 统计当前文件夹下目录的个数
ls -l |grep "^d"|wc -l

#3、统计当前文件夹下文件的个数,包括子文件夹里的
ls -lR|grep "^-"|wc -l

#4、统计文件夹下目录的个数,包括子文件夹里的
ls -lR|grep "^d"|wc -l
Argument list too long, use xargs or exec
传递给ls, rm等命令的参数过长。
#递归查找所有pdf文件并删除
find . -name "*.pdf" -print0 | xargs -0 rm

# xargs 命令是给其他命令传递参数的一个过滤器,-i会将xargs的内容赋值给{}。
find . -name "*.jpeg" | xargs -i rm {}

# 非递归,指定查找深度
find . -maxdepth 1 -name "*.jpeg" -print0 | xargs -0 rm

## 问题:要拷贝test文件夹下以jpg结尾的文件到train目录。
#命令1为:
find test/ -name "*.jpg" | xargs -i cp {} train

#命令2为:
find test/ -name "*.jpg" -exec cp {} train \;
linux修改文件所有者和文件所在组
give user write access to folder
# change group
chgrp -R  用户名    文件名
# need to run with root
chown -R 用户名   文件名  -R

#     r: 4(读权限)
#     w: 2(写权限)
#     x: 1(执行权限)
# 将这些数字相加,就得到每一组的权限值,例如
-rw-r--r--  1 myy groupa 0 Sep 26 06:07 filed
第一组(user):rw- = 4+2+0 = 6
第二组(group):r-- = 4+0+0 = 4
第三组(others):r-- = 4+0+0 = 4

# example: This will make the user & group testuser the owner of the file of /var/www/test/public_html
sudo chown -R testuser:testuser /var/www/test/public_html
zsh 安装使用
sudo apt-get install zsh
#进入zsh
zsh

#安装oh-my-zsh
sh -c "$(wget https://raw.githubusercontent.com/robbyrussell/oh-my-zsh/master/tools/install.sh -O -)"1

# 手动更新
omz update
命令行直接打开指定文件目录
# 安装
sudo apt install libgnome2-bin

#使用 gnome-open path
gnome-open path/to/destination
命令行复制粘贴 Ctrl + Shift + C / V
sends a SIGINT signal
# Terminates the program (like Ctrl+C)
kill -INT 888
# Force kill
kill -9 888
ubuntu 18.04启用SSH server
How to Enable SSH on Ubuntu 18.04
# update and install first
sudo apt update
sudo apt install openssh-server
# check status
sudo systemctl status ssh
# start and stop
sudo systemctl start ssh
sudo systemctl stop ssh
# To enable/disable the SSH service to start during system boot run:
sudo systemctl enable ssh
sudo systemctl disable ssh
Loop in Shell
brewcheck() {

	for i in 1 2 3 4 5
	do
  	echo "Looping ... number $i"
		if brew list $1 >/dev/null ; then
			echo "$1 installed"
			break
		else
			echo "$1 not installed "
		fi
	done
  if brew list $1 >/dev/null ; then
		echo  "final check: $1 installed. good \n"
		echo  " bye."
		exit 0
    # the following line will never be executed.
		echo "**********"
	else
		echo "\n\n $1 cannot be installed. make sure your network condition is good enough and try it later... \n\n"
	fi

}

brewcheck  zeromq


# Latest bash version 3.0+ has inbuilt support for setting up ranges:
for i in {1..5}
do
   echo "Welcome $i times"
done

# Bash v4.0+ has inbuilt support for setting up a step value using {START..END..INCREMENT} syntax:
echo "Bash version ${BASH_VERSION}..."
for i in {0..10..2}
  do
     echo "Welcome $i times"
 done

# Three-expression bash for loops syntax
for (( c=1; c<=5; c++ ))
do
   echo "Welcome $c times"
done

# break and continue
for file in /etc/*
do
	if [ "${file}" == "/etc/resolv.conf" ]
	then
		countNameservers=$(grep -c nameserver /etc/resolv.conf)
		echo "Total  ${countNameservers} nameservers defined in ${file}"
		break
	fi
done

# continue
FILES="$@"
for f in $FILES
do
  # if .bak backup file exists, read next file
	if [ -f ${f}.bak ]
	then
		echo "Skiping $f file..."
		continue  # read next file and skip the cp command
	fi
  # we are here means no backup file exists, just use cp command to copy file
	/bin/cp $f $f.bak
done
$1 for shell variable $1 for awk
The shell does not perform any expansions on single-quoted strings.
#!bin/bash

# show the line with first column value is greater than 20
# provider file name
awk '$1 > 20' < "$1"
# close the ' string, insert the shell $1
# (inside " in case there are special characters),
# then reopen the ' string.
cat input.csv | awk -F, '$1~/' "$1" '/ {print "is good"}'

# use variable
awk -F, -v needle="$1" '$1 ~ needle {print "is good"}' < input.csv
同时输出到屏幕和文件
How to redirect output to a file and stdout
if you only care about stdout:ls -a | tee output.file
If you want to include stderr, do:
program [arguments...] 2>&1 | tee outfile
2>&1 redirects channel 2 (stderr/standard error) into channel 1 (stdout/standard output), such that both is written as stdout. It is also directed to the given output file as of the tee command.
Furthermore, if you want to append to the log file, use tee -a as:
program [arguments...] 2>&1 | tee -a outfile
显示文件byte大小
ls -l file.name | awk '{print $5}'

wc -c < file.name
hex查看 二进制查看文件
xxd filename | less
Open the file in Vim.
Run
:%!xxd(transform buffer to hex)Edit.
Run
:%!xxd -r(reverse transformation)Save.
Joint Photographic Experts Group: jpg = jpeg with header
FF D8 FFPNG (Portable Network Graphics)
89 50 4E 47 0D 0A 1A 0A“50 4E 47”: These bytes represent the ASCII values for the characters “PNG”WebP
52 49 46 46 XX XX XX XX 57 45 42 50“52 49 46 46” = RIFF (Resource Interchange File Format) file. “57 45 42 50”: These bytes represent the ASCII values for the characters “WEBP”